From all of us at Mimi’s House we wish you and yours a happy and joyous summer! May you enjoy every moment with your little ones as you soak up the sun! (and don’t forget the sunscreen!)
From all of us at Mimi’s House we wish you and yours a happy and joyous summer! May you enjoy every moment with your little ones as you soak up the sun! (and don’t forget the sunscreen!)
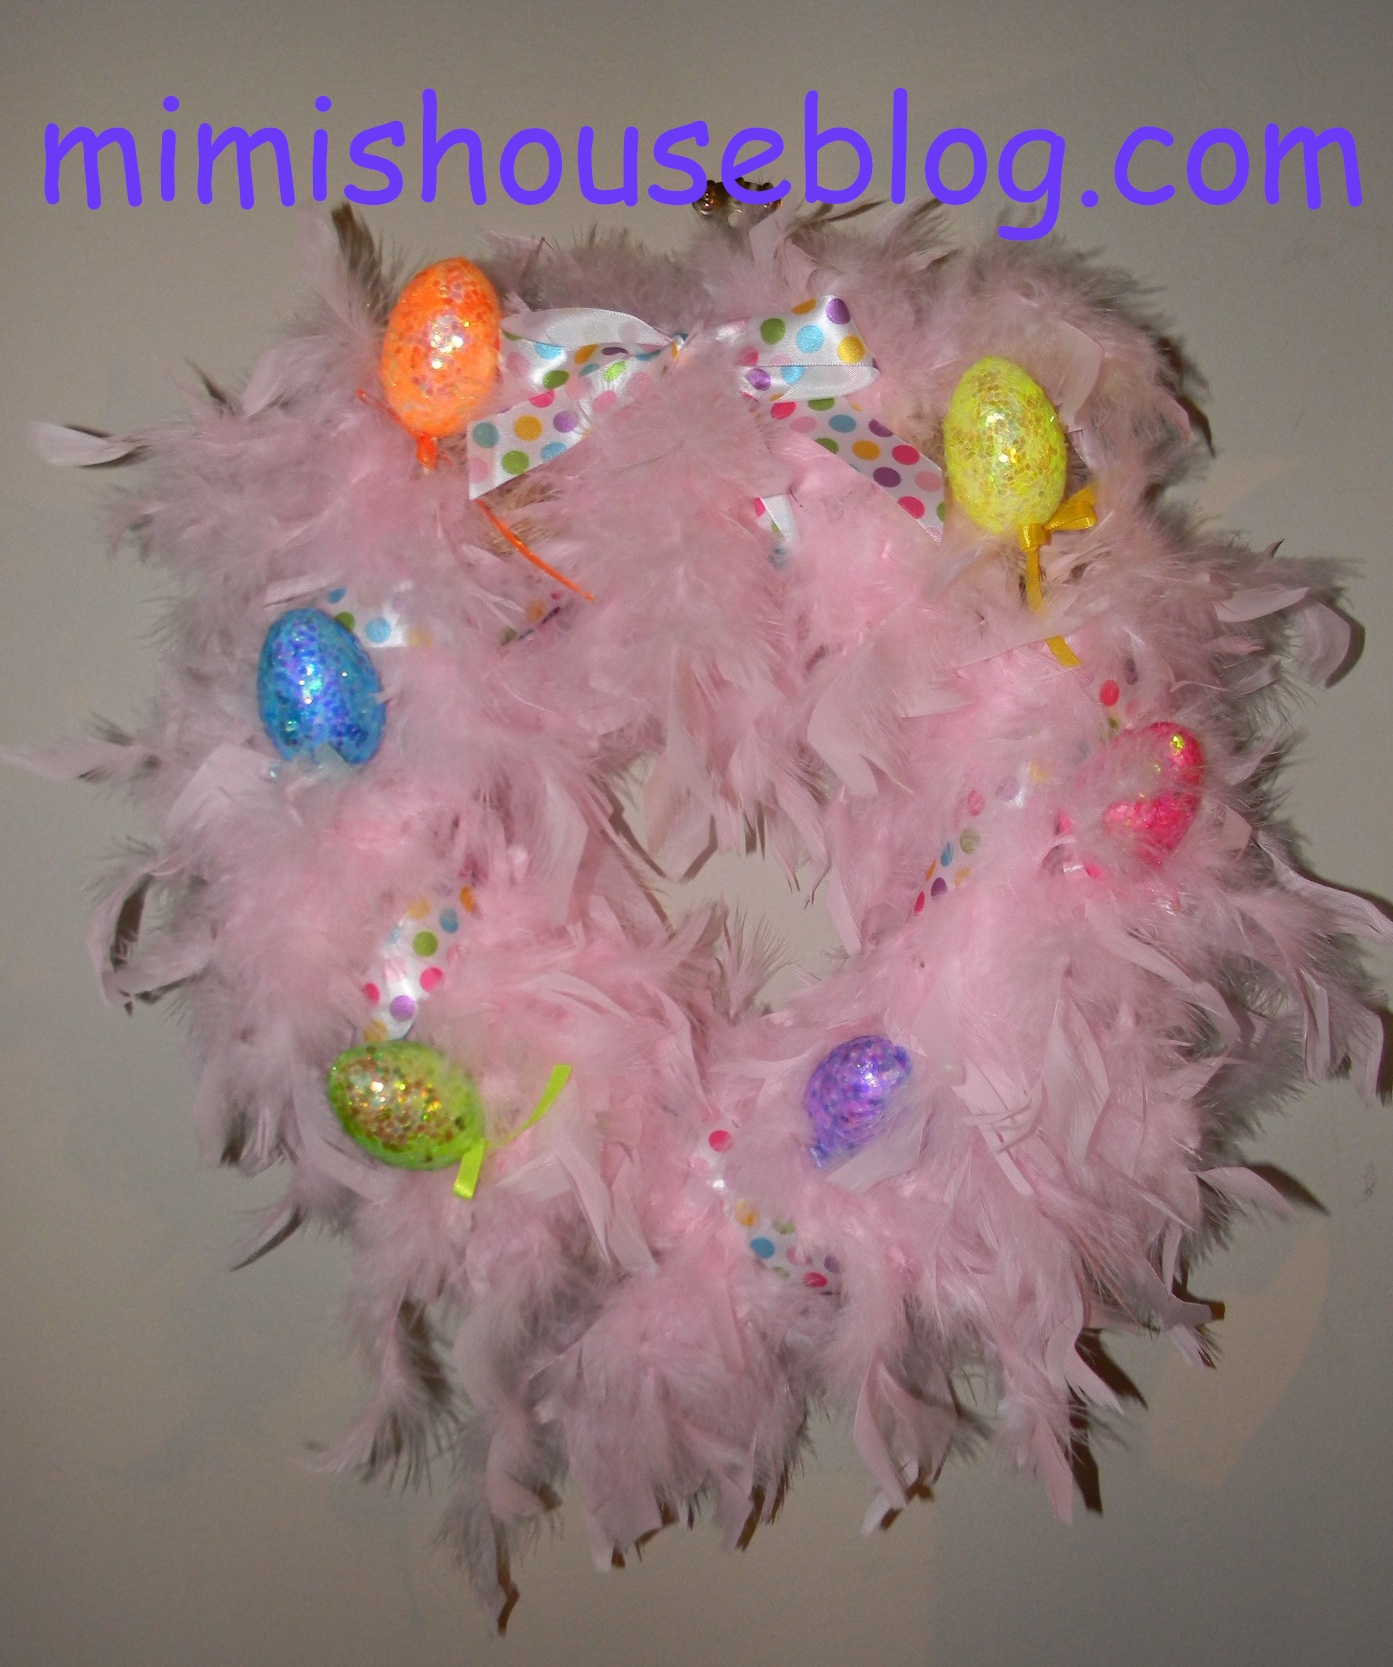
Although easter has come and gone, I thought I would share with you some of the fun craft ideas I did with my kids this year. I spied these feather wreaths at a craft market and just loved them, but the price was a little too much for my budget so the kids and I decided to make our own for just a fraction of the cost. We purchased three feather boas and a straw wreath from the Dollar Store along with some decorative eggs and ribbon. The process was very simple. We wound the feather boas around the wreath then I hot glued the ornaments and ribbon on. It took about ten minutes and cost us only $6.00!
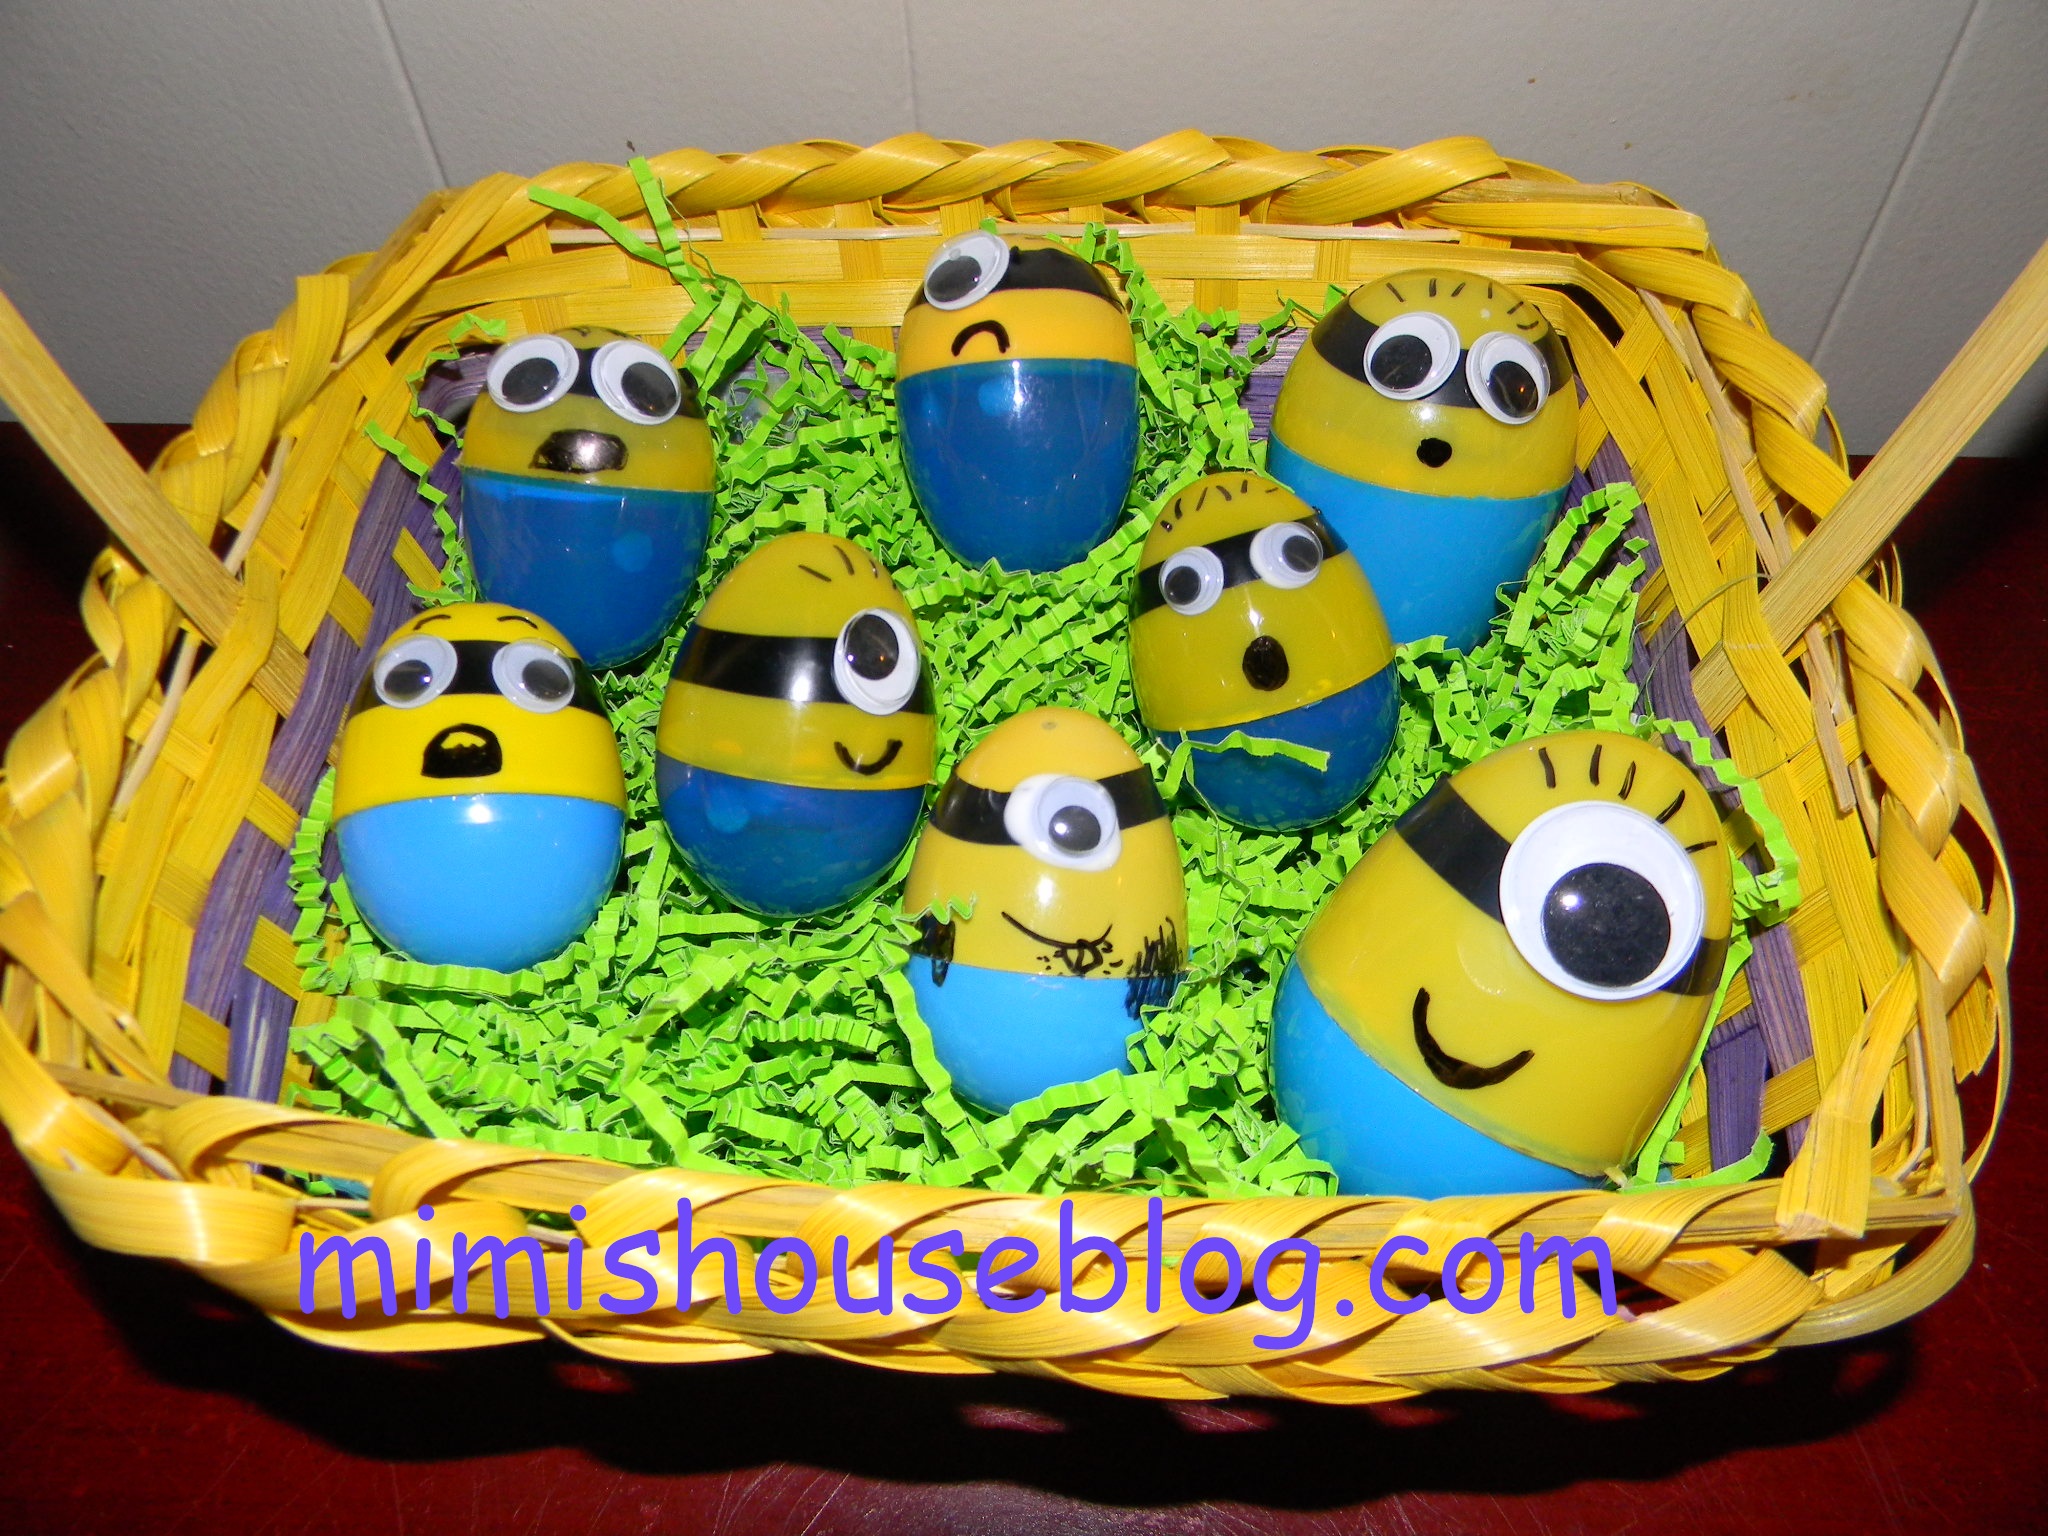
The other fun idea we came up with was Minion Eggs. I thought we were being quite original but after doing the project we found several blogs with the same concept. If your children like the Despicable Me movies then this is the craft for them. Using blue and yellow easter eggs, we simple switched tops with bottoms added electrical tape and google eyes for glasses and used sharpie to draw on faces. For fun I filled them with dried beans and hot glued them shut so kids could use them as musical shakers. This way we get to enjoy them all year!
![]()
Introducing our new logo for Mimi’s House! Many thanks to Gio Creative for the colourful new design!
Mimi’s House is an educational children’s television program that was originally aired in 2002 on WPS-TV in Wichita, Kansas. The show features original songs, crafts, recipes and more! The pilot episode aired on Shaw TV in Vancouver, BC and was called “Toddler Time.” It was filmed at our local church and featured my toddler, Melody (who is now 20!) Wow! Time really does fly by! I am so excited to share some of these old gems with you as well as some new video clips I am working on with my younger children.
To kick off the new look, I have posted a brand new video produced by Fish Video productions for Mimi’s House. It is a beautiful arrangement of Scarborough Fair sung by my sweet Moriah. Enjoy!

Life gets busy here at Mimi’s House. I can’t believe a whole year has come and gone since I first started this blog! Thank you to all of my readers for you support and encouragement! I am so glad that you took the time to stop by and visit my site and hopefully along the way you’ve been able to gather some creative ideas to use in your own home and classroom.
February is a busy month for us as we have several birthdays in our family as well as Valentines Day to celebrate. (For some fun and creative Valentines to make visit last year’s Feb. post)
This year Malachi chose Pirates as the theme for his birthday party. This was a very fun and simple theme that can be incorporated for a boy or girl. I have even used this theme when teaching preschool and I must say they LOVED it! To achieve the Pirate look, use black and red decor throughout. I made my own printables for the snack table which made it fun for the kids.
The cake was a treasure chest. I was short on time so it didn’t turn out as well as I had hoped but the birthday boy was happy with it and that is what counts! To make the treasure chest cake you need two loaf pans, golden cake mix, chocolate icing and some “jewels”. Fill one of the loaf pans only 1/4 full of batter. This will serve as your lid. Once cake is baked, hollow out the “treasure chest” . Save some of the cake pieces to prop up the lid. Place “lid” on top of treasure chest and ice entire cake except for the inside. Place jewels inside cake and you are set to go!
Other snacks we had were hotdog Pirate Ships, Canon Balls (cheese puffs), Fish and Chips (fish crackers and potato chips), Shark Blood (punch), and Ocean Water (water bottles). The kids loved the funny names we gave the food.
Games we played were “Pin the Patch on the Pirate”, “Treasure Hunt”, and “Fishing”.
For Pin the Patch on the Pirate, I drew a simple pirate face onto poster board and the kids took turns getting blindfolded and tried to place a patch on the pirate’s eye.
The treasure Hunt was the most fun. The children took turns finding clues hidden throughout the house which finally led to a Treasure Chest filled with candy and Pirate’s Loot! The fishing game was a bed sheet draped between a doorway and the kids placed a fishing rod (wooden dowel with twine and attached clothespin) over the “water” (bedsheet). Someone was hiding on the other side and attached a prize to the rod when they went fishing..or sometimes a smelly sock or other fun item would appear! This got lots of laughs but of course they all eventually ended up with a nice prize to take home.
All in all it was a great day to be a Pirate!
Christmas time is filed with excitement and wonderment. Young children love to create and explore all of the senses during the holidays. Children love cooking and creating during the holidays. Involve your children in as much of the planning and preparations as possible. This helps to foster a sense of ownership in the festivities and builds independence and pride within your child. I have posted some of our favourite Christmas crafts that I have done at home and at school with my children. It just takes some time and a few simple supplies to complete these holiday art projects. May you enjoy the holidays and always keep the wonder and magic of Christmas alive in your hearts!
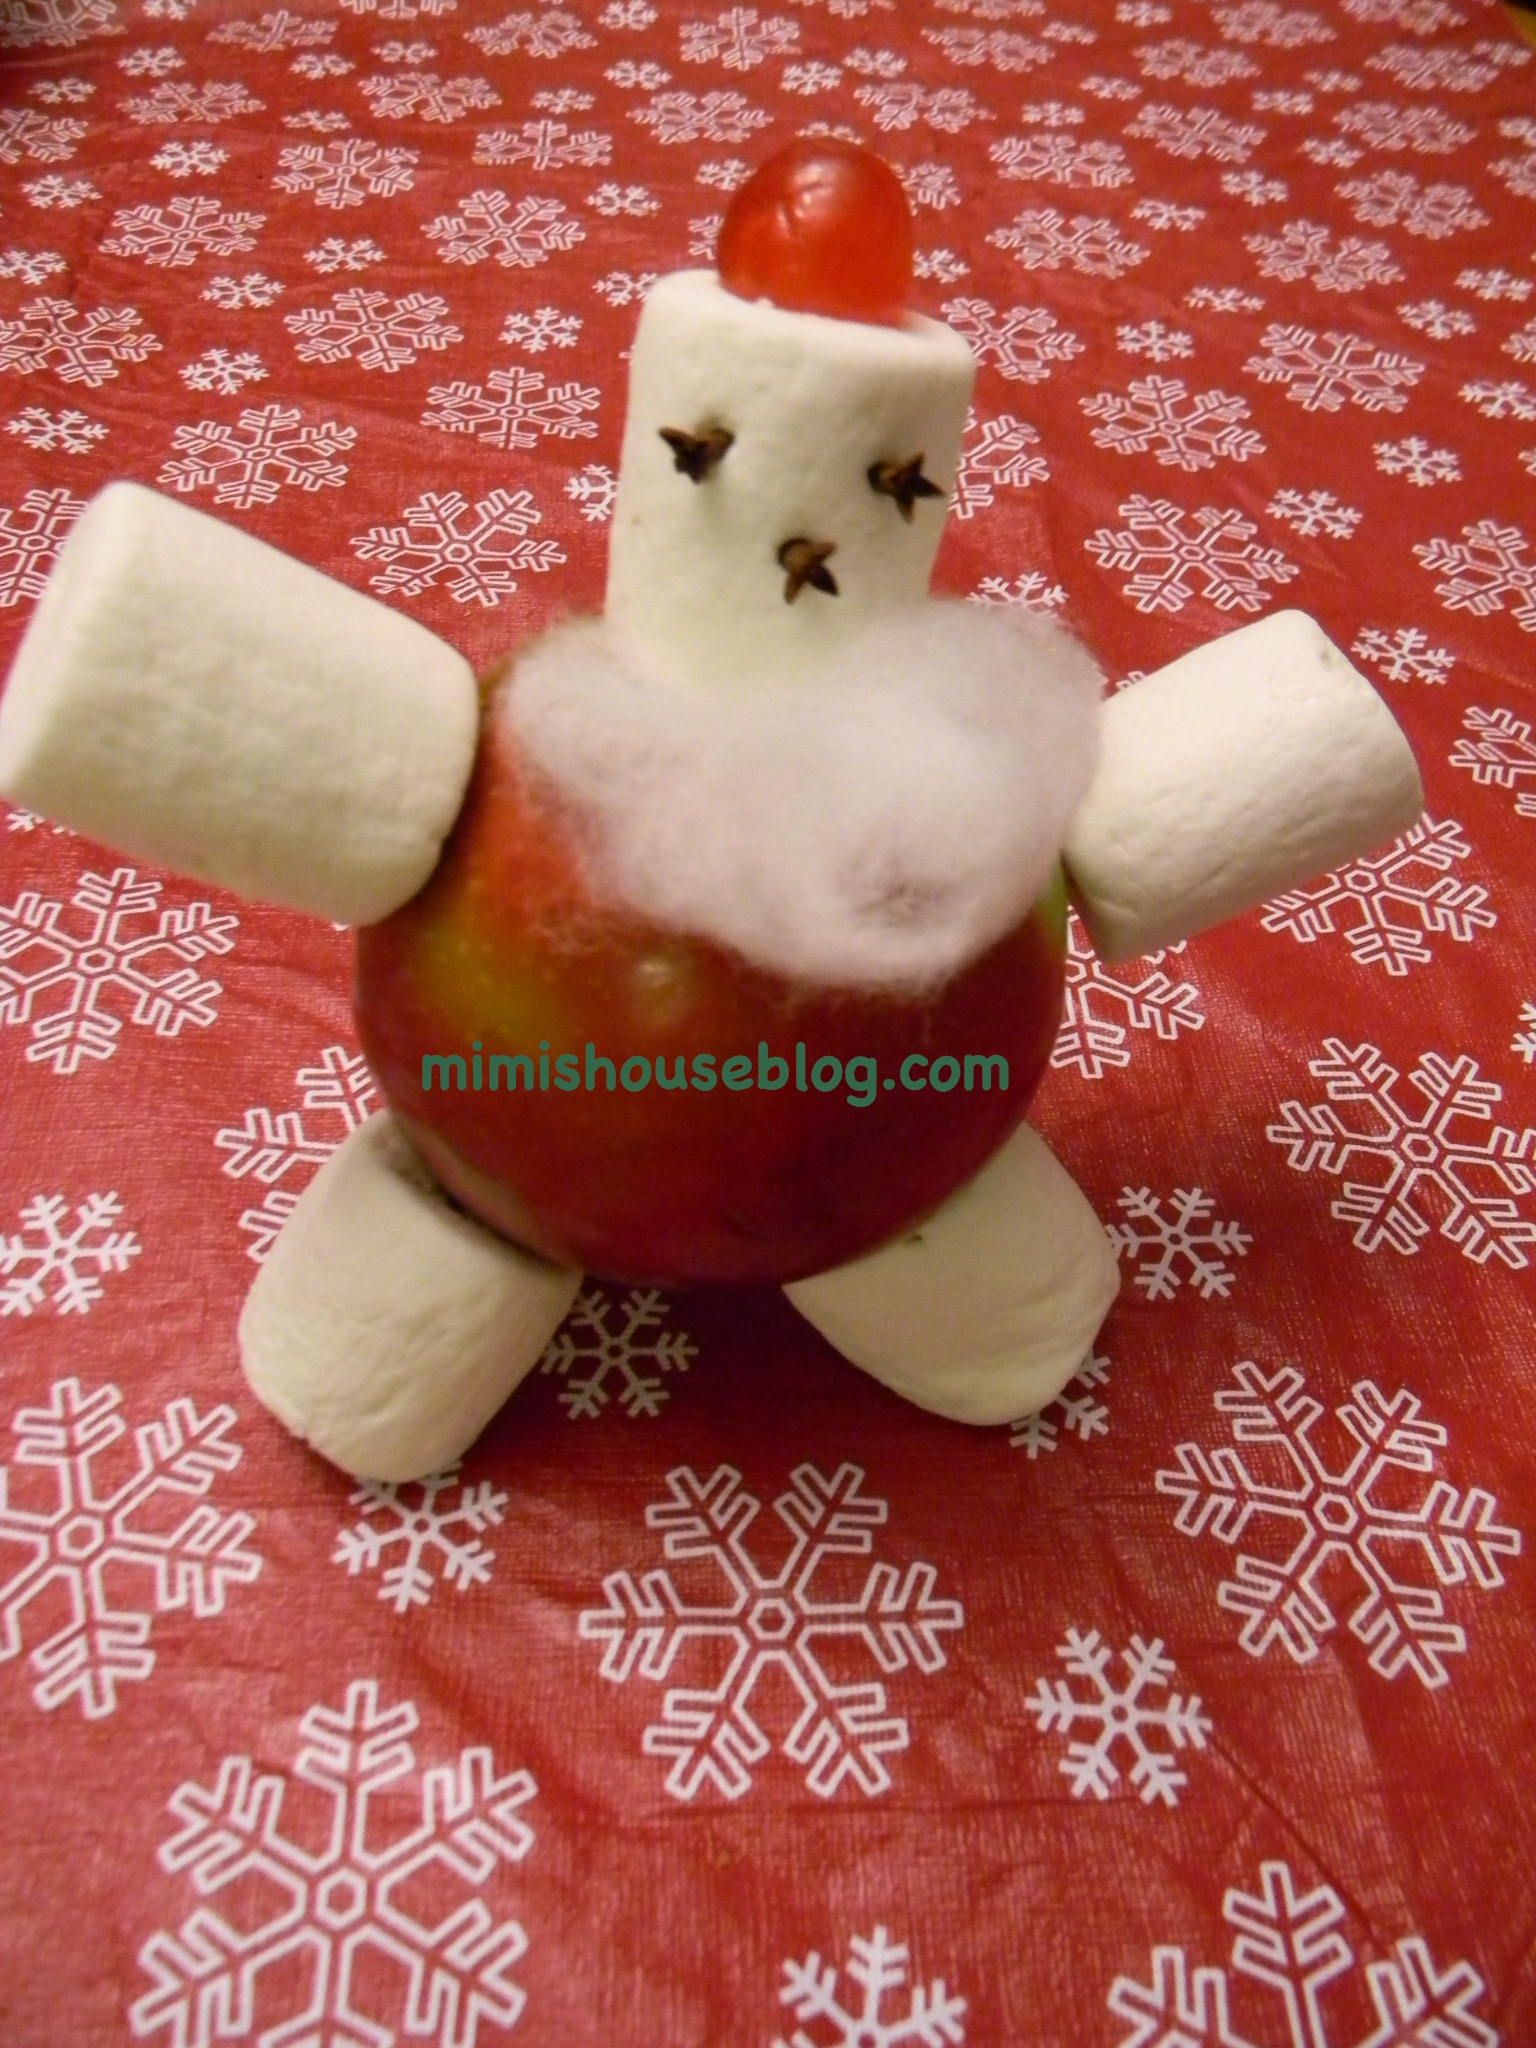
This adorable Santa was made by placing toothpicks into the apple and adding marshmallows on the toothpicks for the arms, legs and head. A cherry for the hat, cotton ball for the beard, and cloves for the face complete this little apple Santa.
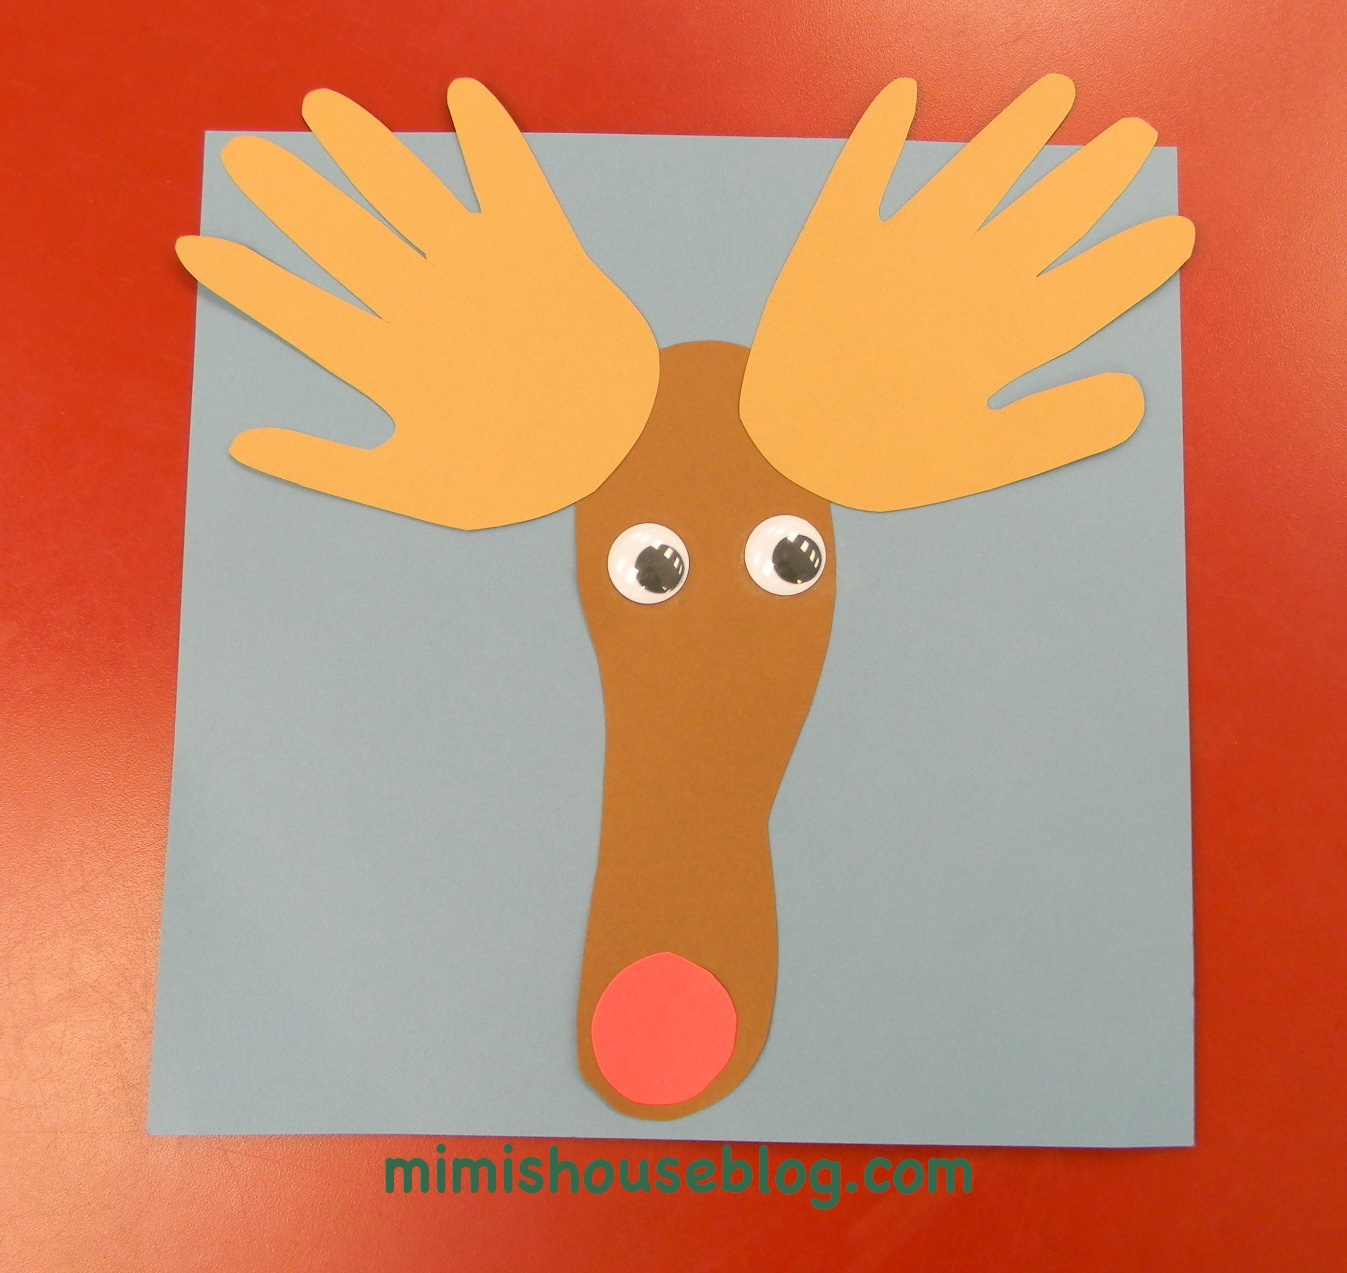
A cute reindeer made by tracing your child’s feet and hands!
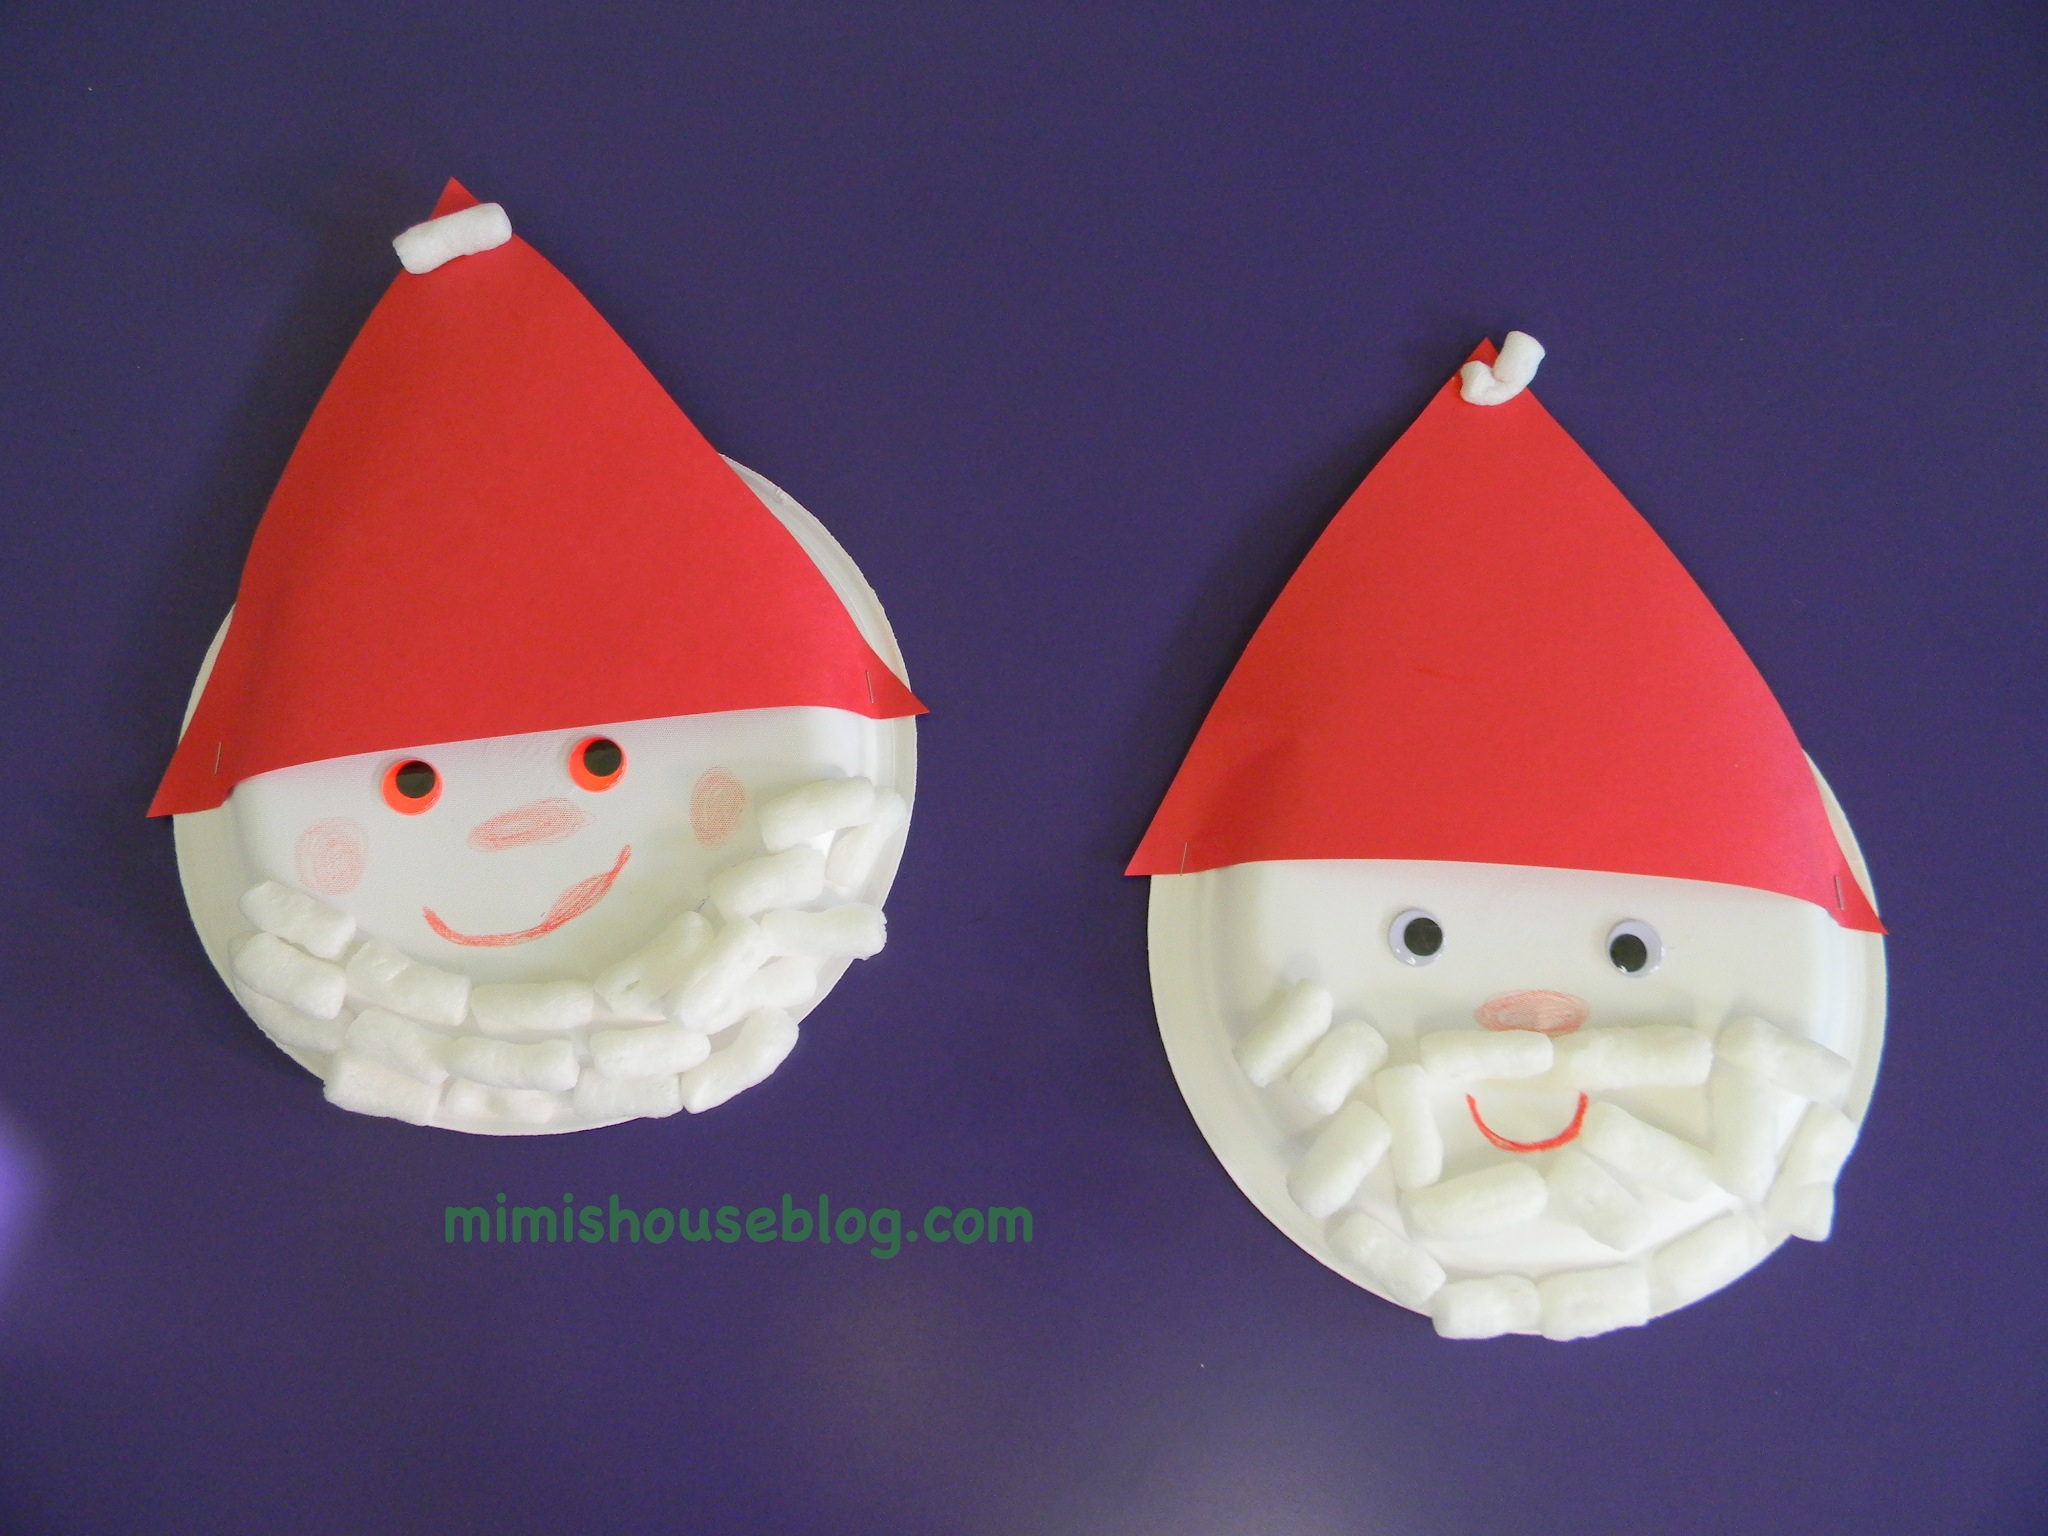
Paper plate Santas or elves are made by glueing on packing peanuts for the beard , google eyes and construction paper triangles for the hats.

Coffee Filter Snowman are fun to make. Simply glue on coffee filters (One small and one large) for the body and head and add construction paper hats, nose, eyes and buttons. Decorate with snowflakes and white paint.
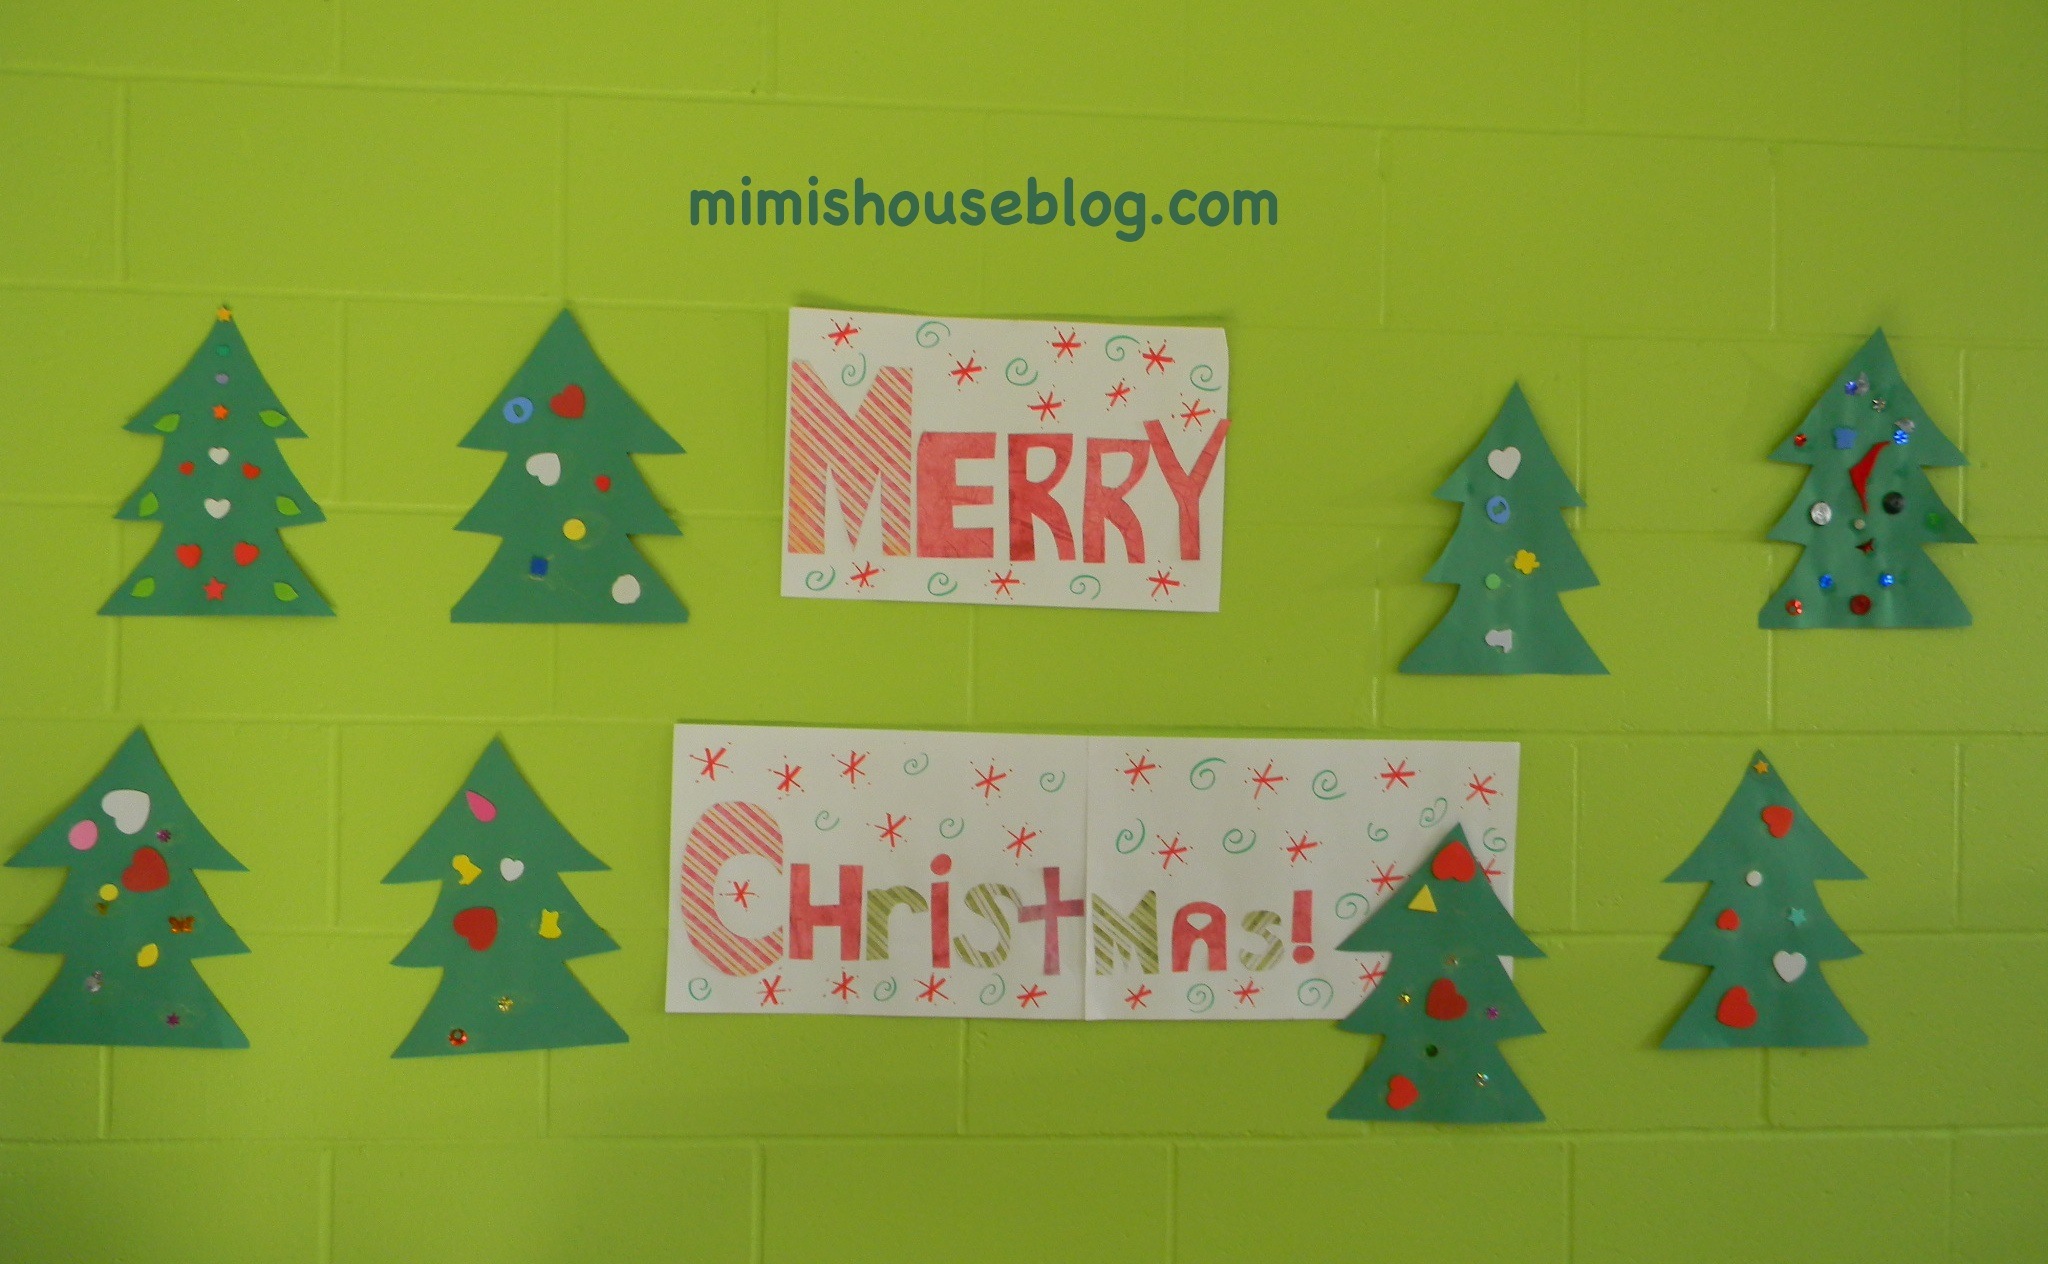
Construction paper trees are fun to decorate with foam shapes, buttons, sequins an glitter!
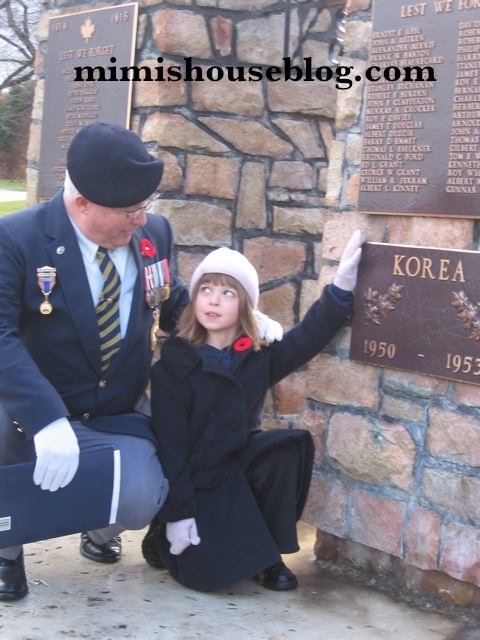
In honour of those who have served in the armed forces I thought it would be nice to post a Remembrance Day craft. The poppies are simple to make so even preschoolers can make them yet still elegant enough for older children to enjoy them as well. To make the poppy, cut four even heart shapes out of red paper. Glue the hearts onto white paper to form a poppy. Add a black circle and/or small black hearts to the centre for the middle of the flower. Poppies can be embellished with glitter, seeds or other decorative items to make them unique.
In Flanders Fields
In Flanders fields the poppies blow
Between the crosses, row on row,
That mark our place; and in the sky
The larks, still bravely singing, fly
Scarce heard amid the guns below.
We are the Dead. Short days ago
We lived, felt dawn, saw sunset glow,
Loved and were loved, and now we lie
In Flanders fields.
Take up our quarrel with the foe:
To you from failing hands we throw
The torch; be yours to hold it high.
If ye break faith with us who die
We shall not sleep, though poppies grow
In Flanders fields.
by John McCrae, May 1915
With Halloween just around the corner, why not throw a Harry Potter party? This would be an excellent way to introduce young readers to the world of chapter books. For a classroom setting you could read the book out loud to the class. When the book is completed, have a class party to celebrate! Children can come in costume and participate in Potter themed activities while you serve Harry Potter themed snacks. The possibilities are endless! To inspire you, I have shared a few pics of a lovely Harry Potter party my friend Janet gave for her daughter Cali’s 7th birthday along with the instructions for the adorable Hedwig Cake I made for the occasion. Enjoy!

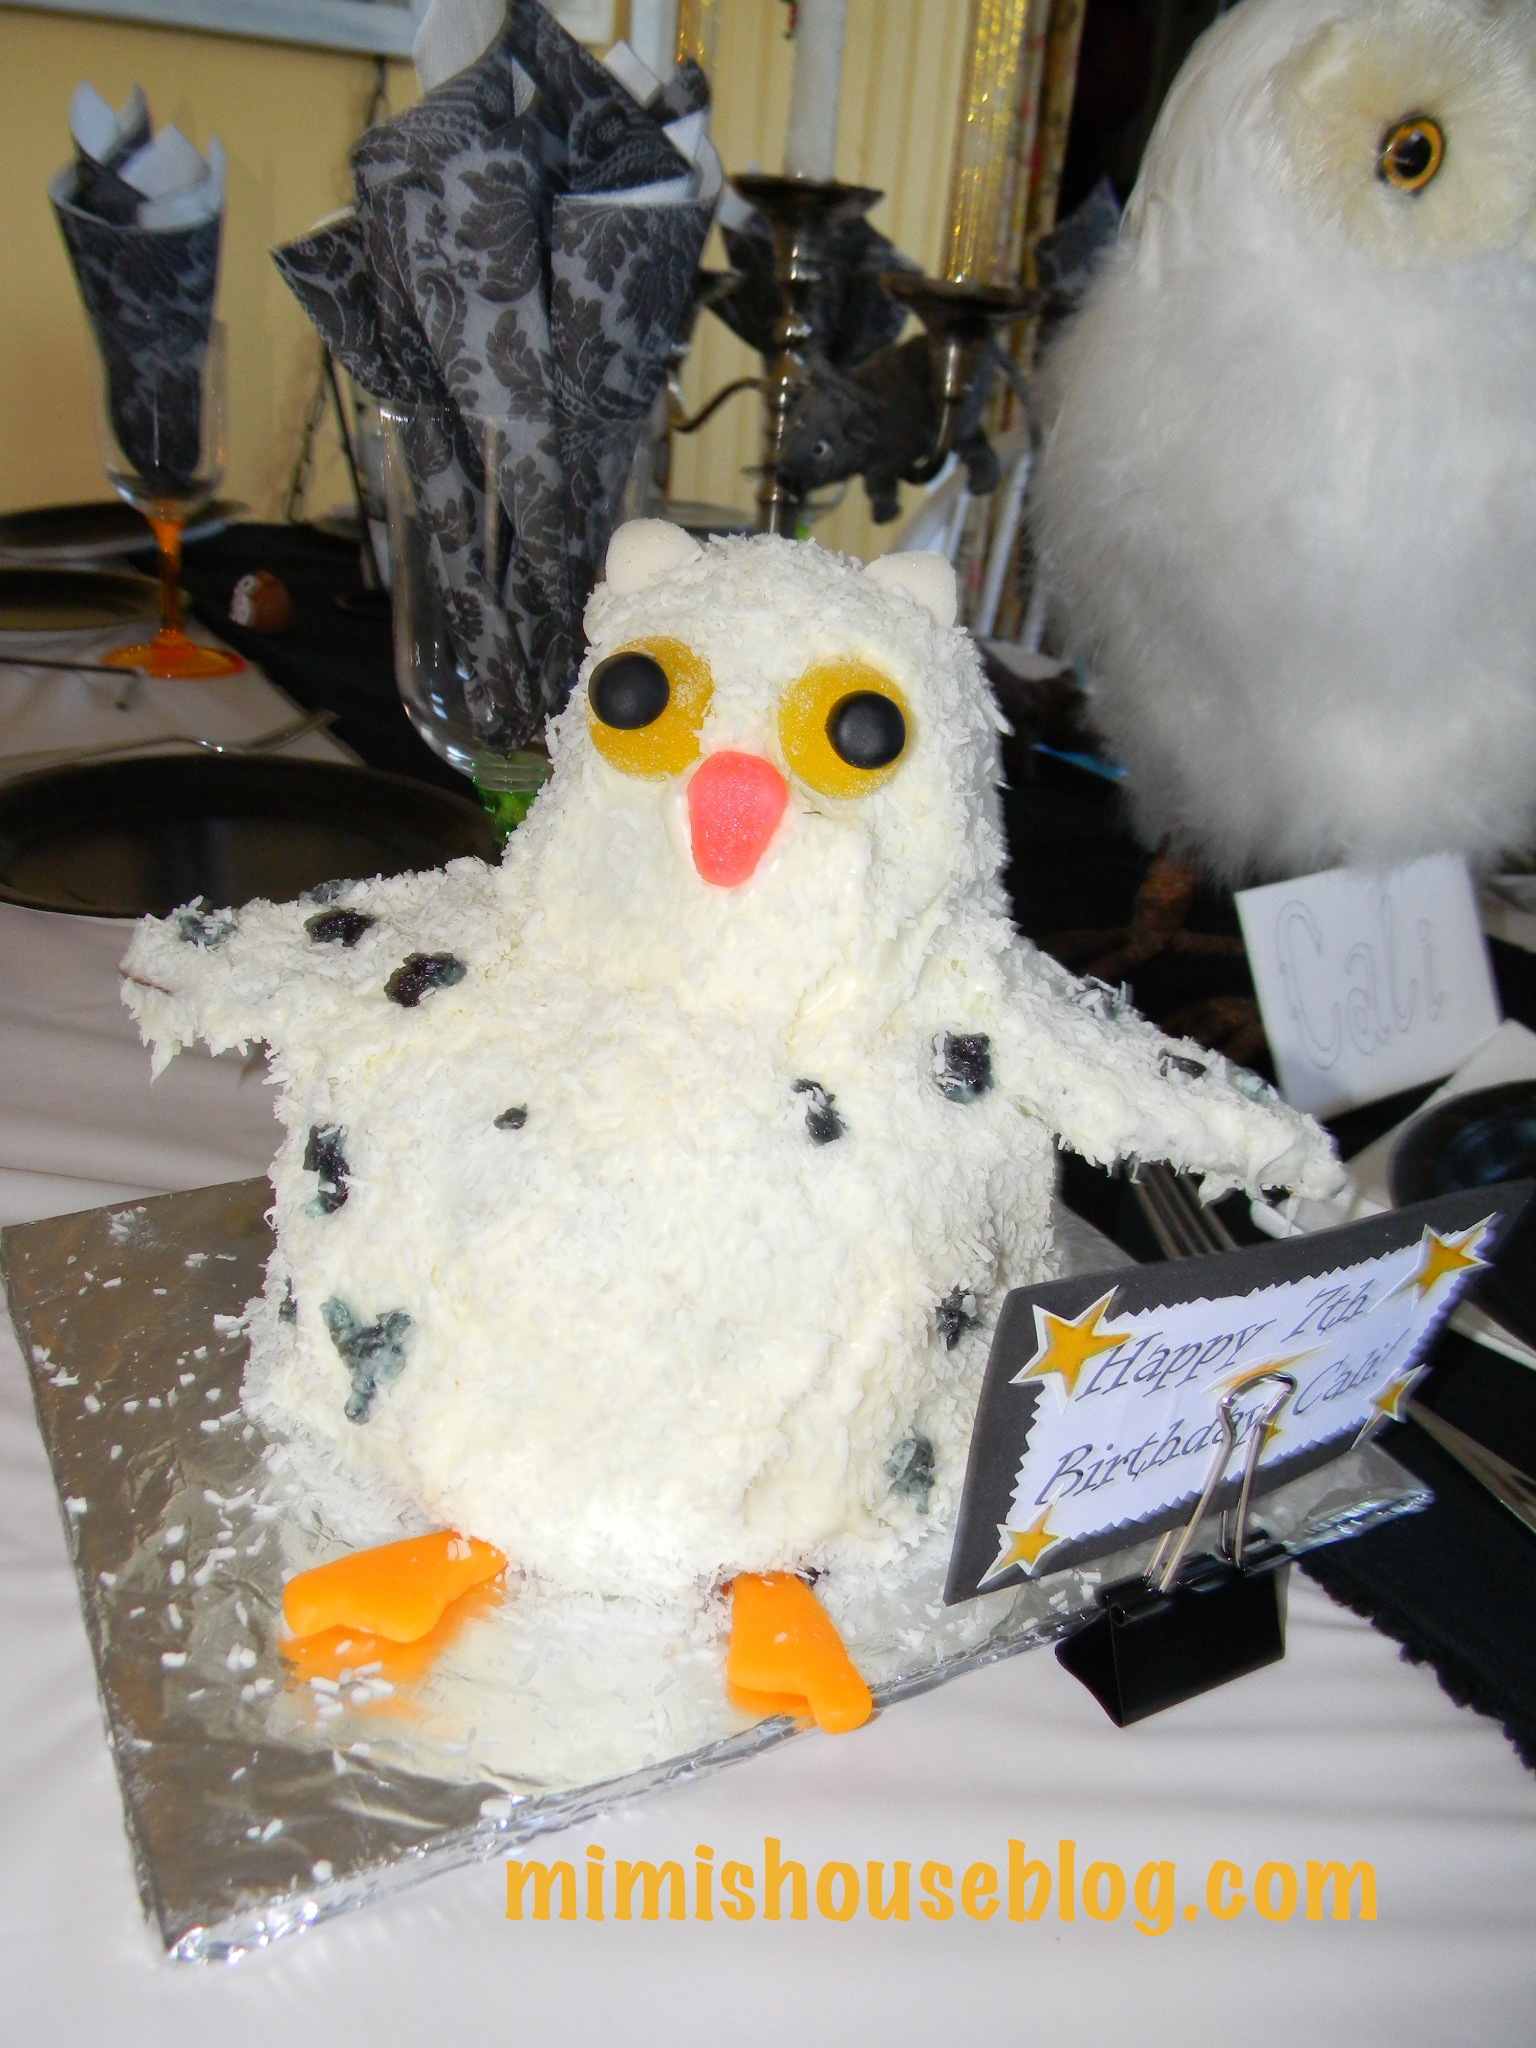
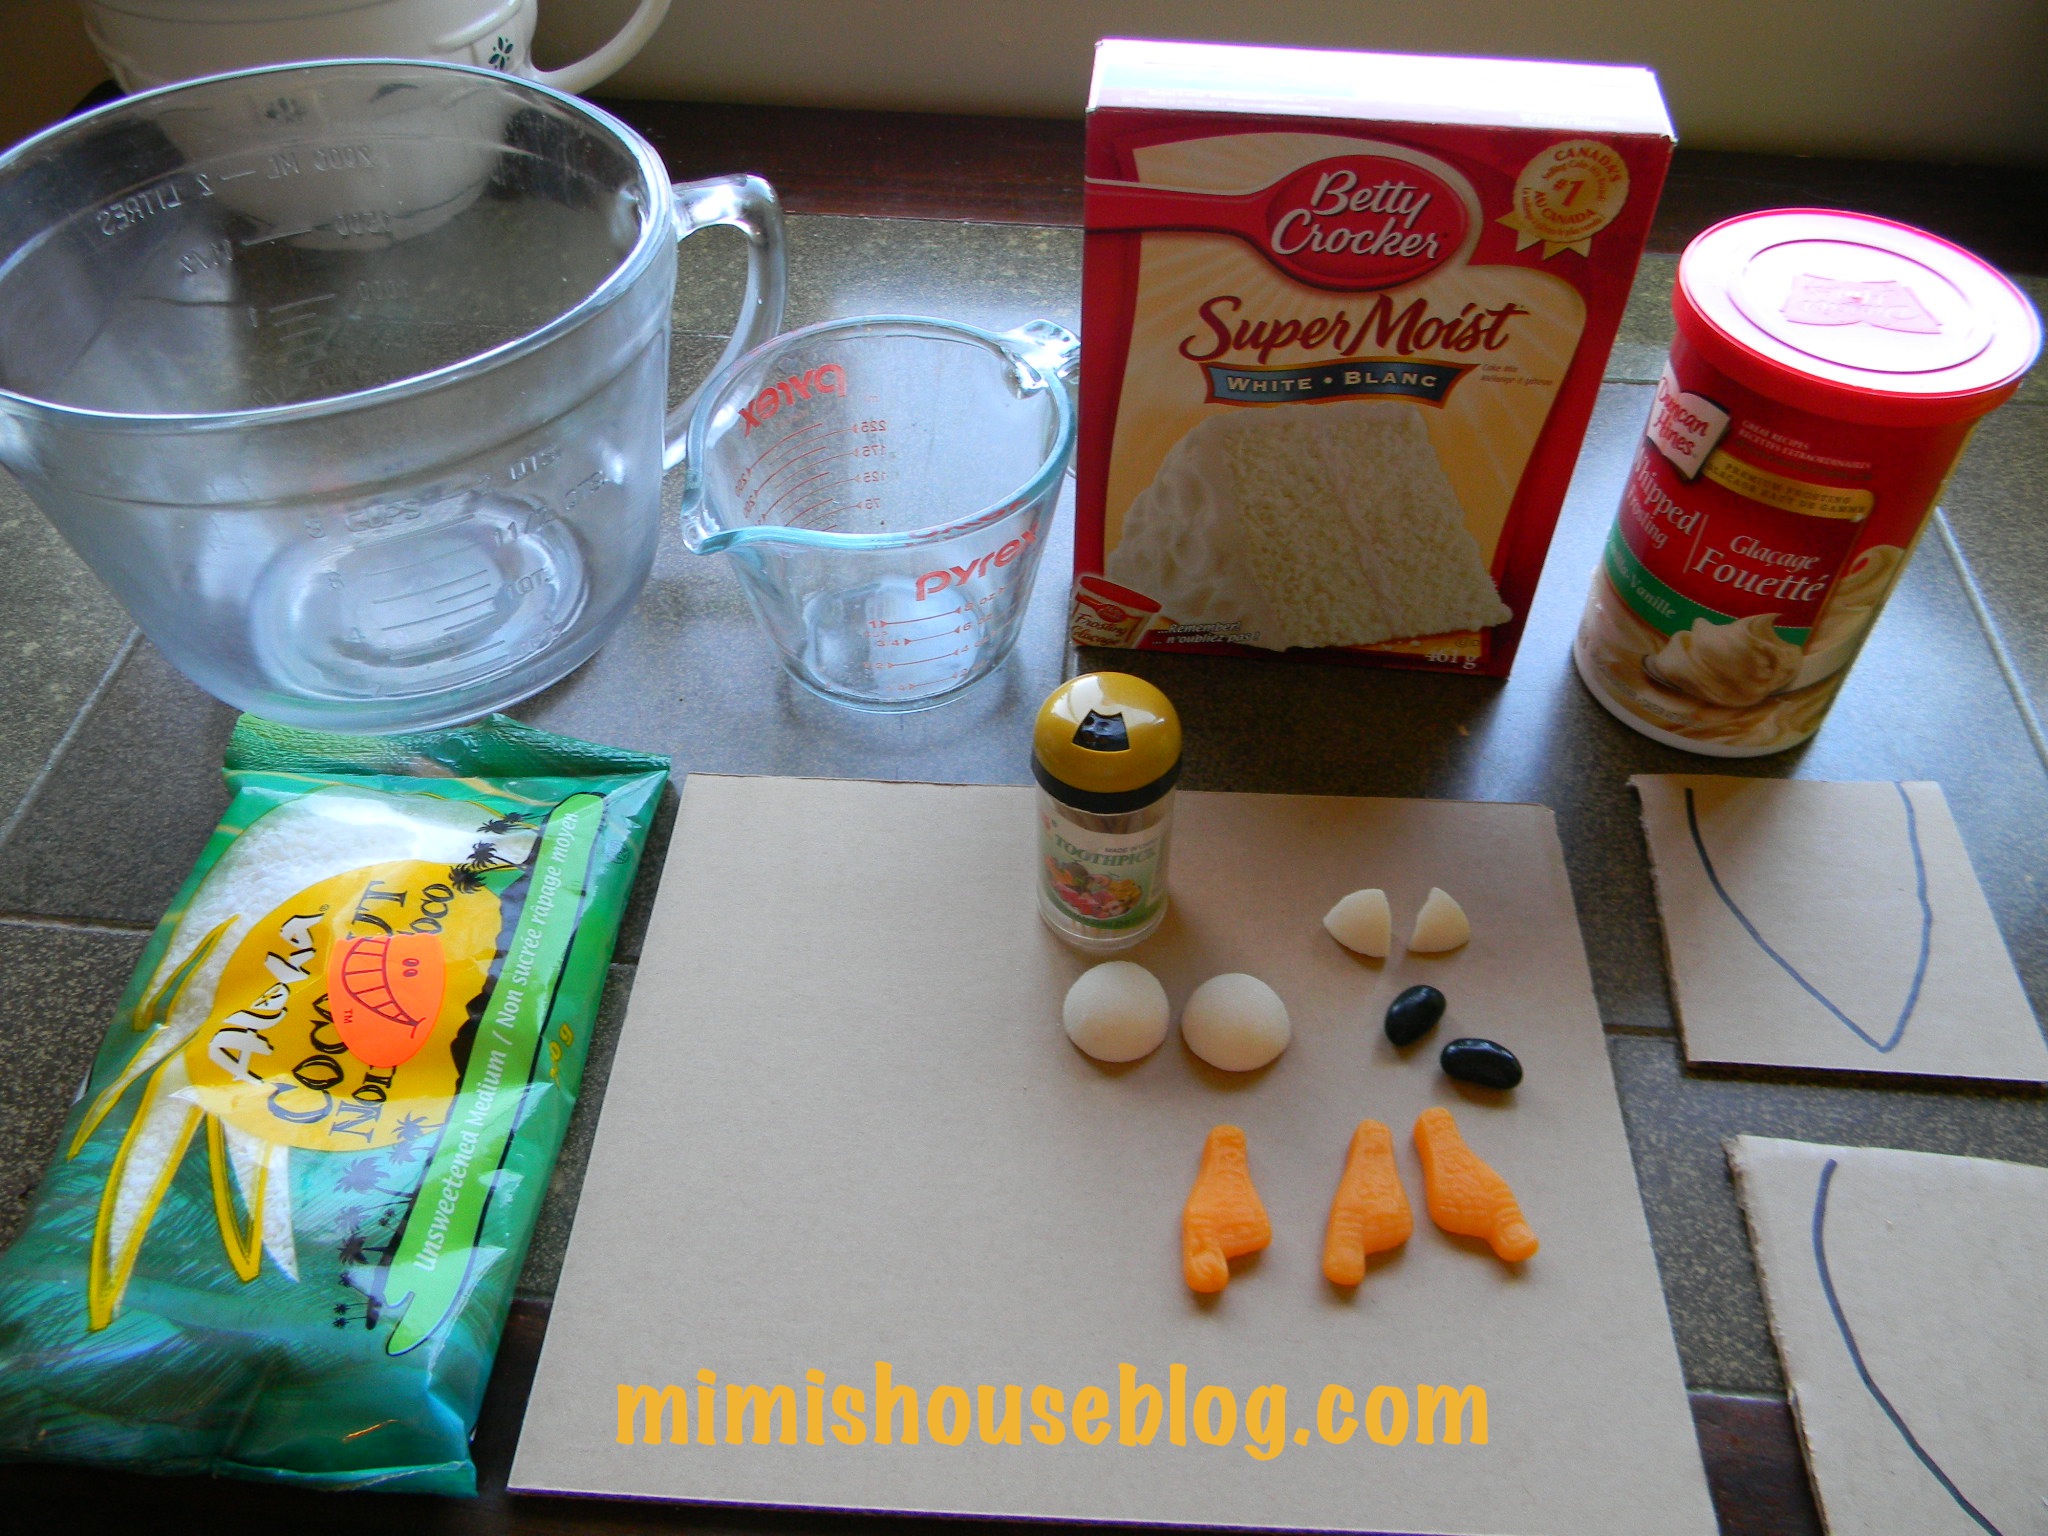
To make the Hedwig cake you will need:
1 box white cake mix
1 bag of shredded coconut (feathers)
2 white gumdrops (ears)
2 yellow gumdrops (eyes)
1 orange gumdrop (beak)
2 black jelly beans (eyeballs)
2 orange gummy candies (feet)
toothpicks
white icing
2 wing shaped cardboard cutouts
black icing
Instructions:
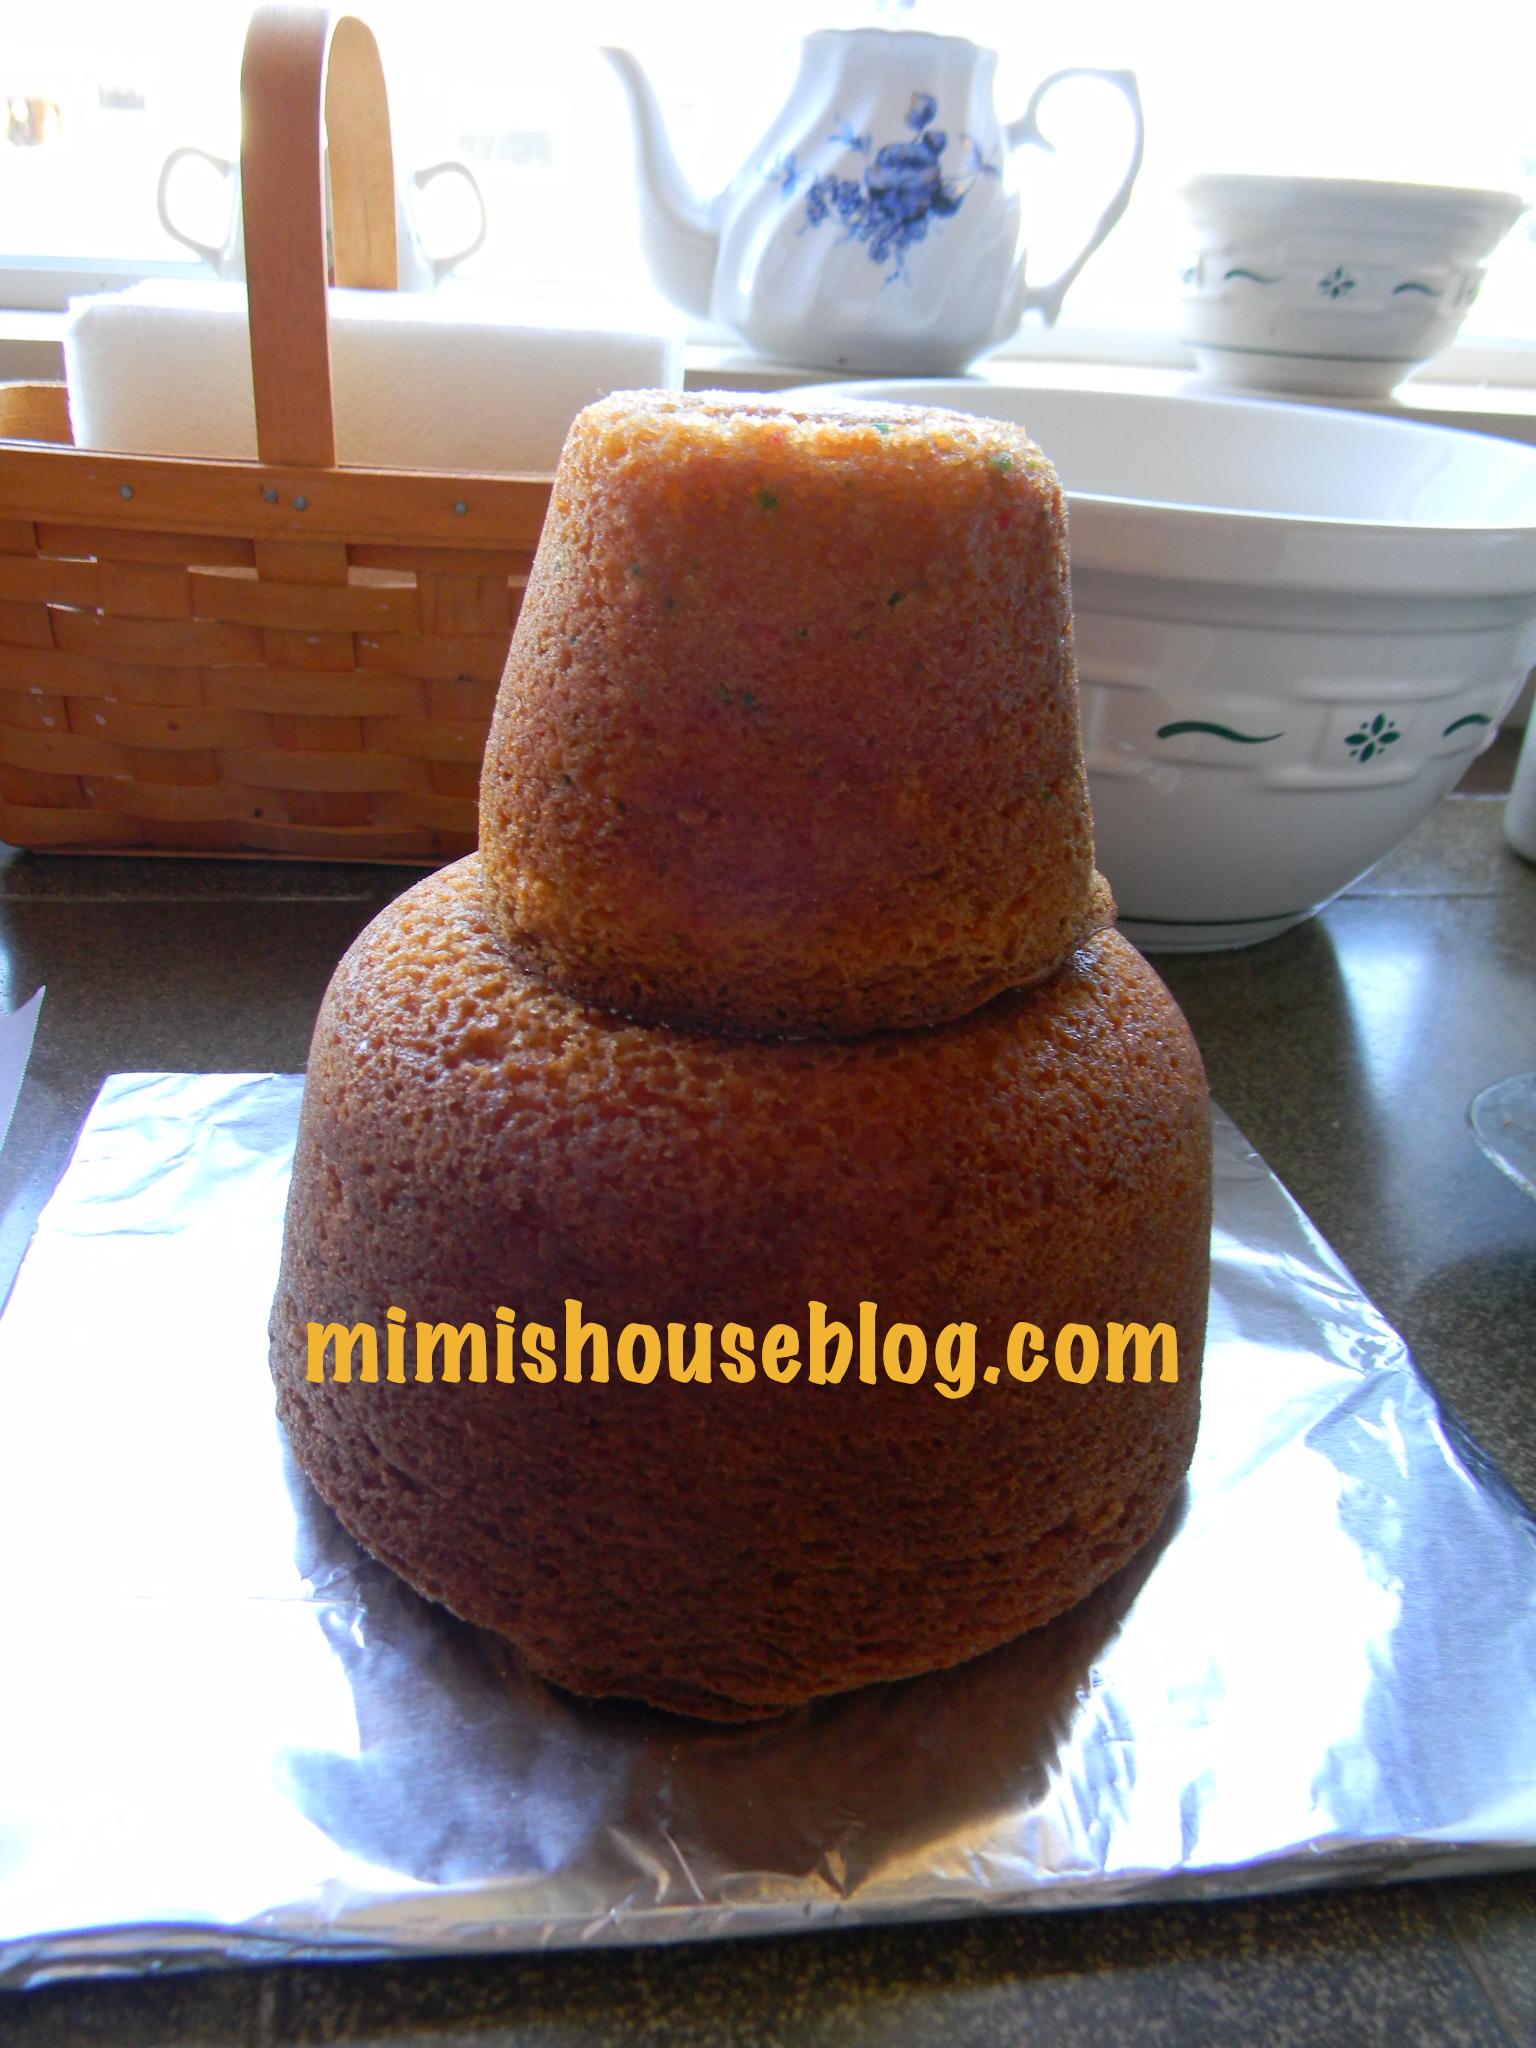
Place the cake batter in an 8 cup glass (oven safe) pyrex measuring bowl for the body and in a 2 cup glass pyrex measuring cup for the head. Bake according to box instructions.
Turn cake upside down and place small cake on top of large cake to resemble the owl’s body and head. Attach with toothpicks and icing as glue.
Attach cardboard wings to sides of cake. Cardboard should be strong enough to slide right into the cake itself.
Ice the entire cake including the cardboard wings with white icing.
Cover in coconut.
Using kitchen scissors cut out shapes from gumdrops to make beak , feet and ears. Place on cake.
Attach gumdrop eyes with toothpicks and glue on eyeballs with icing.
Drop small spoonfulls of black icing onto cake to look like Hedwig’s spots.
Bon appetite!
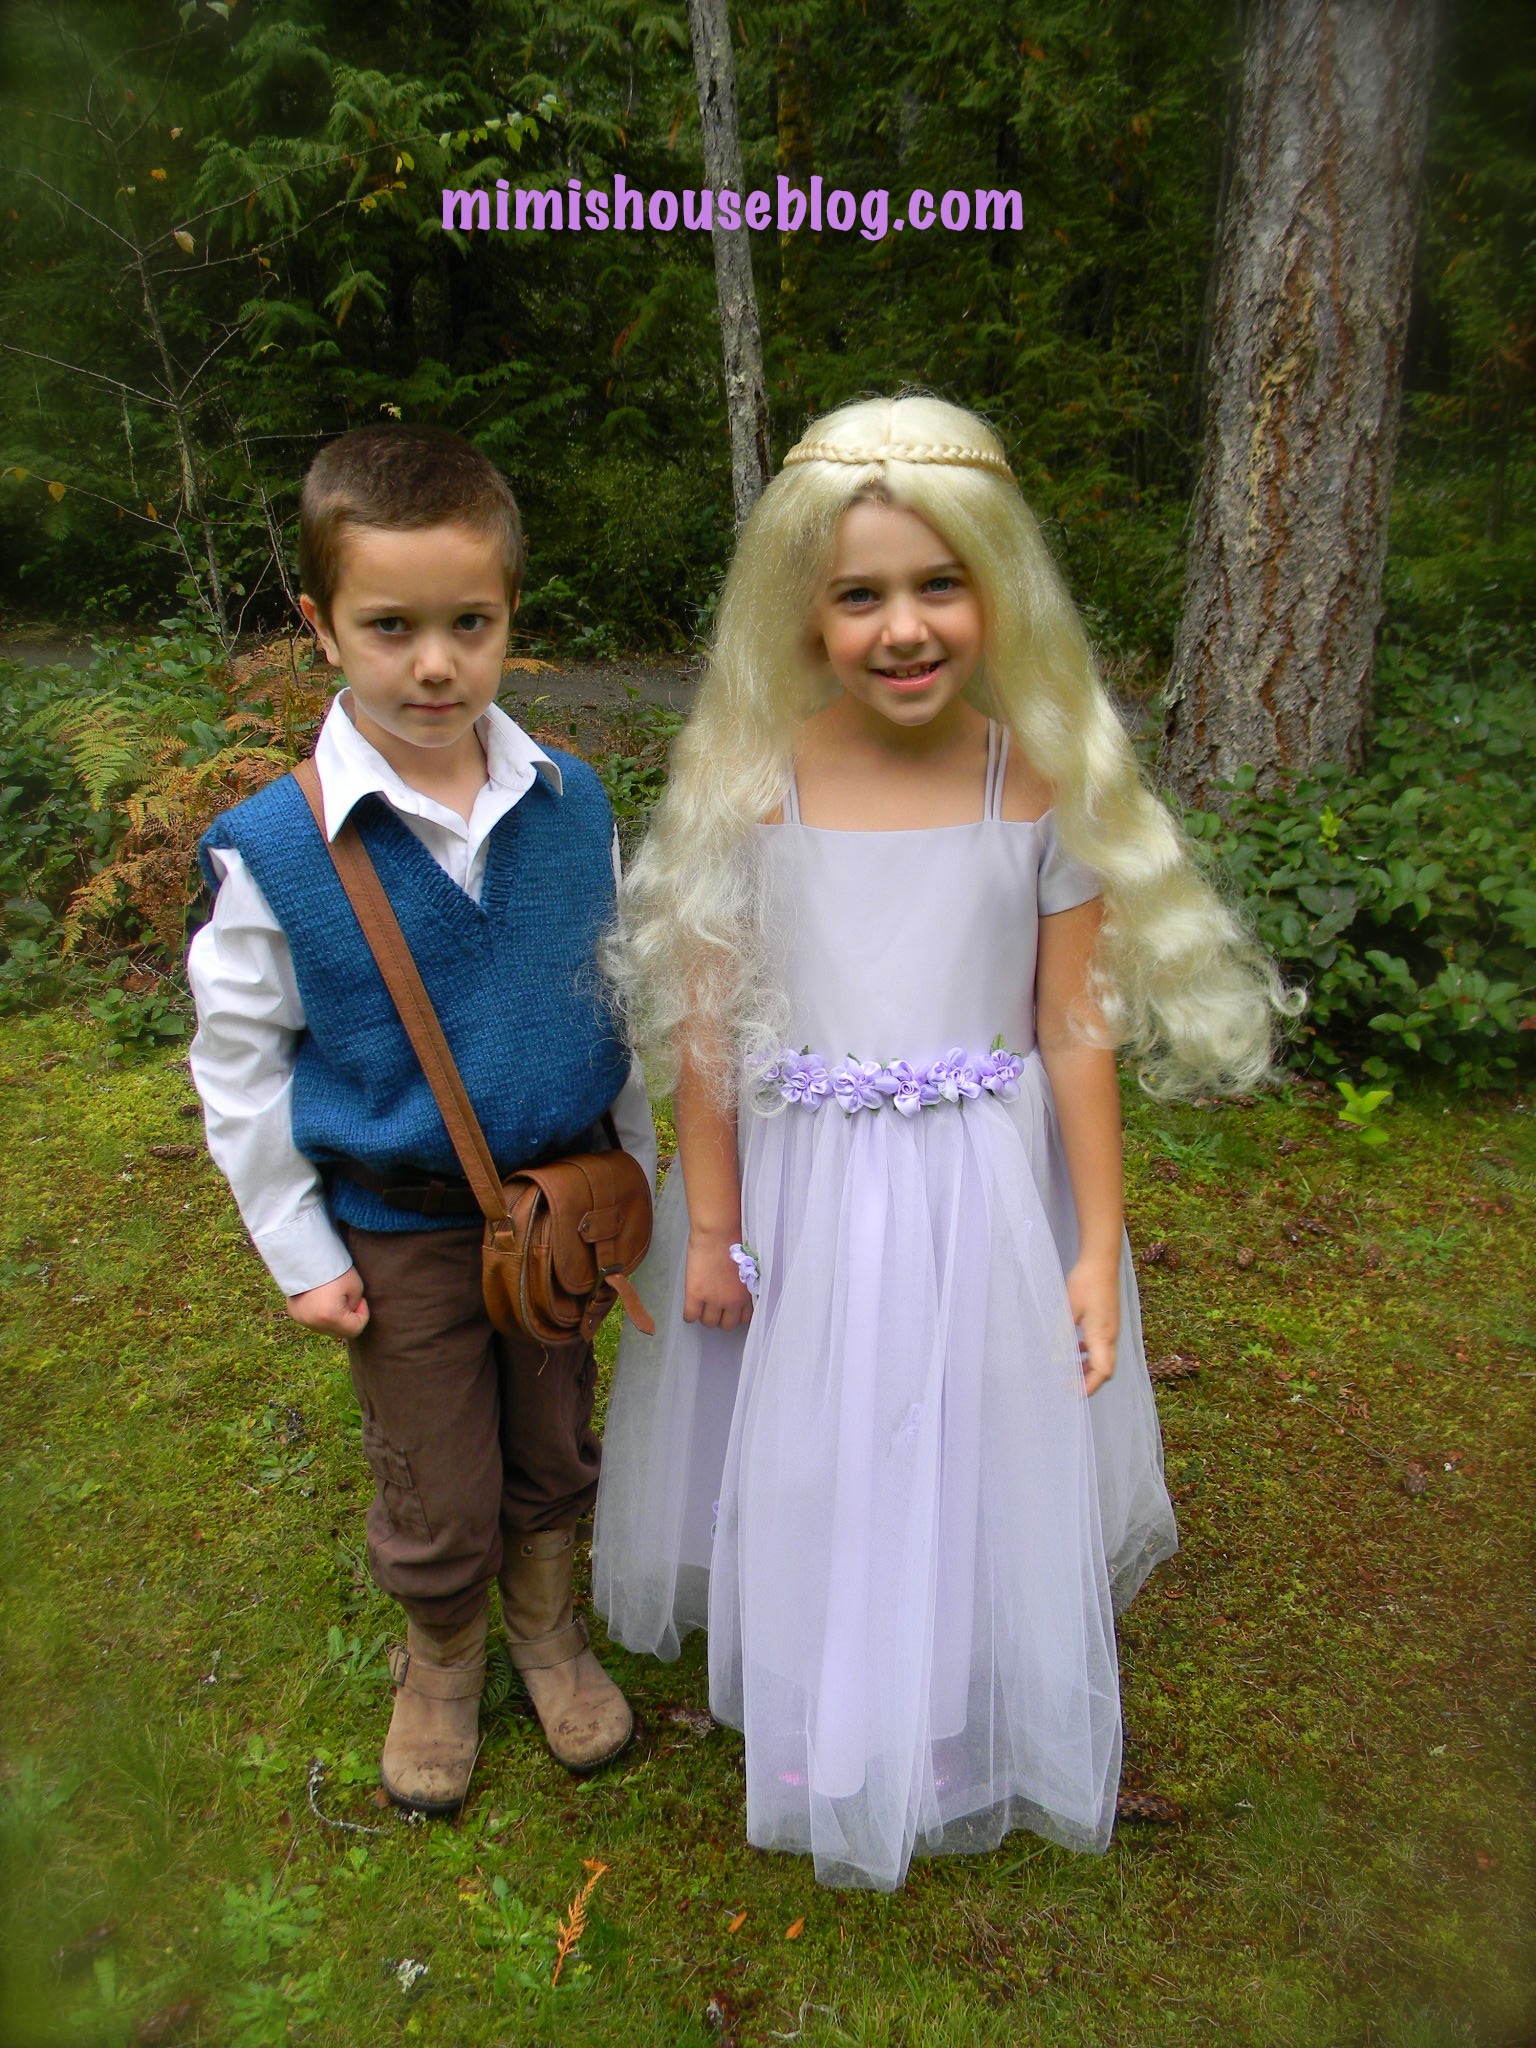
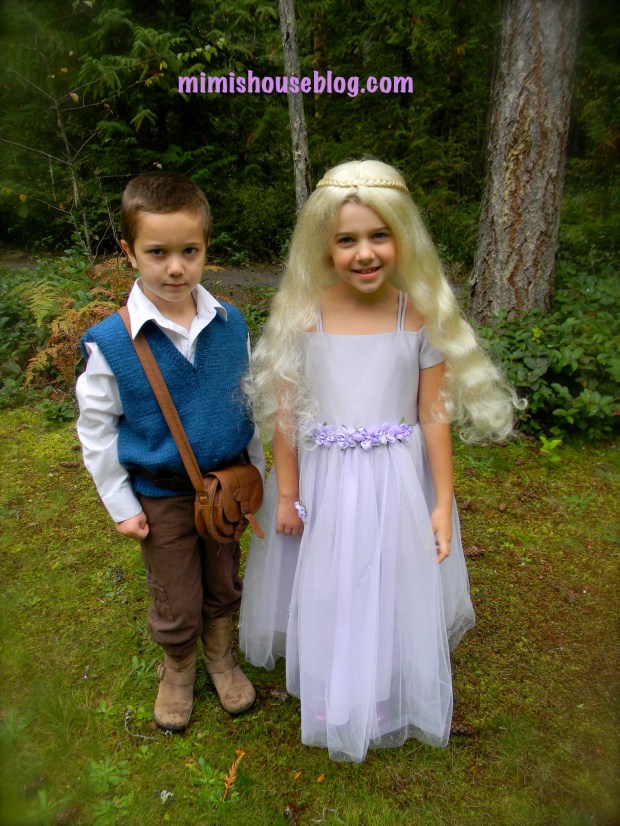
For Moriah’s 7th Birthday party, she wanted to do a Tangled theme from the new Disney movie. I had a hard time finding ideas for this party but after getting the creative juices flowing, we came up with some fun ideas. We decorated the party using the palace colours of Purple and Yellow and hung paper lanterns from the ceiling. Some of the party activities included pin the nose of Flynn Rider’s wanted poster, watching the Tangled movie while munching on goodies from the candy bar and making our very own lanterns for guests to take home!
The guest all came dressed as royalty which made it fun for all. For Flynn’s costume we used a white dress shirt with a blue vest, coupled with brown pants, brown boots, belt and purse. All found at the thrift store! Rapunzels’ dress was a special party dress that she had passed down from her older sister. We added the wig for fun.

Party Favour bags were found at the Dollar Store and the party crackers we made using cardboard paper rolls. We filled each roll with a ziplock baggie of candies. Then covered them in tissue paper and tied with a ribbon. A very simple yet fun party treat for the guests to take home.
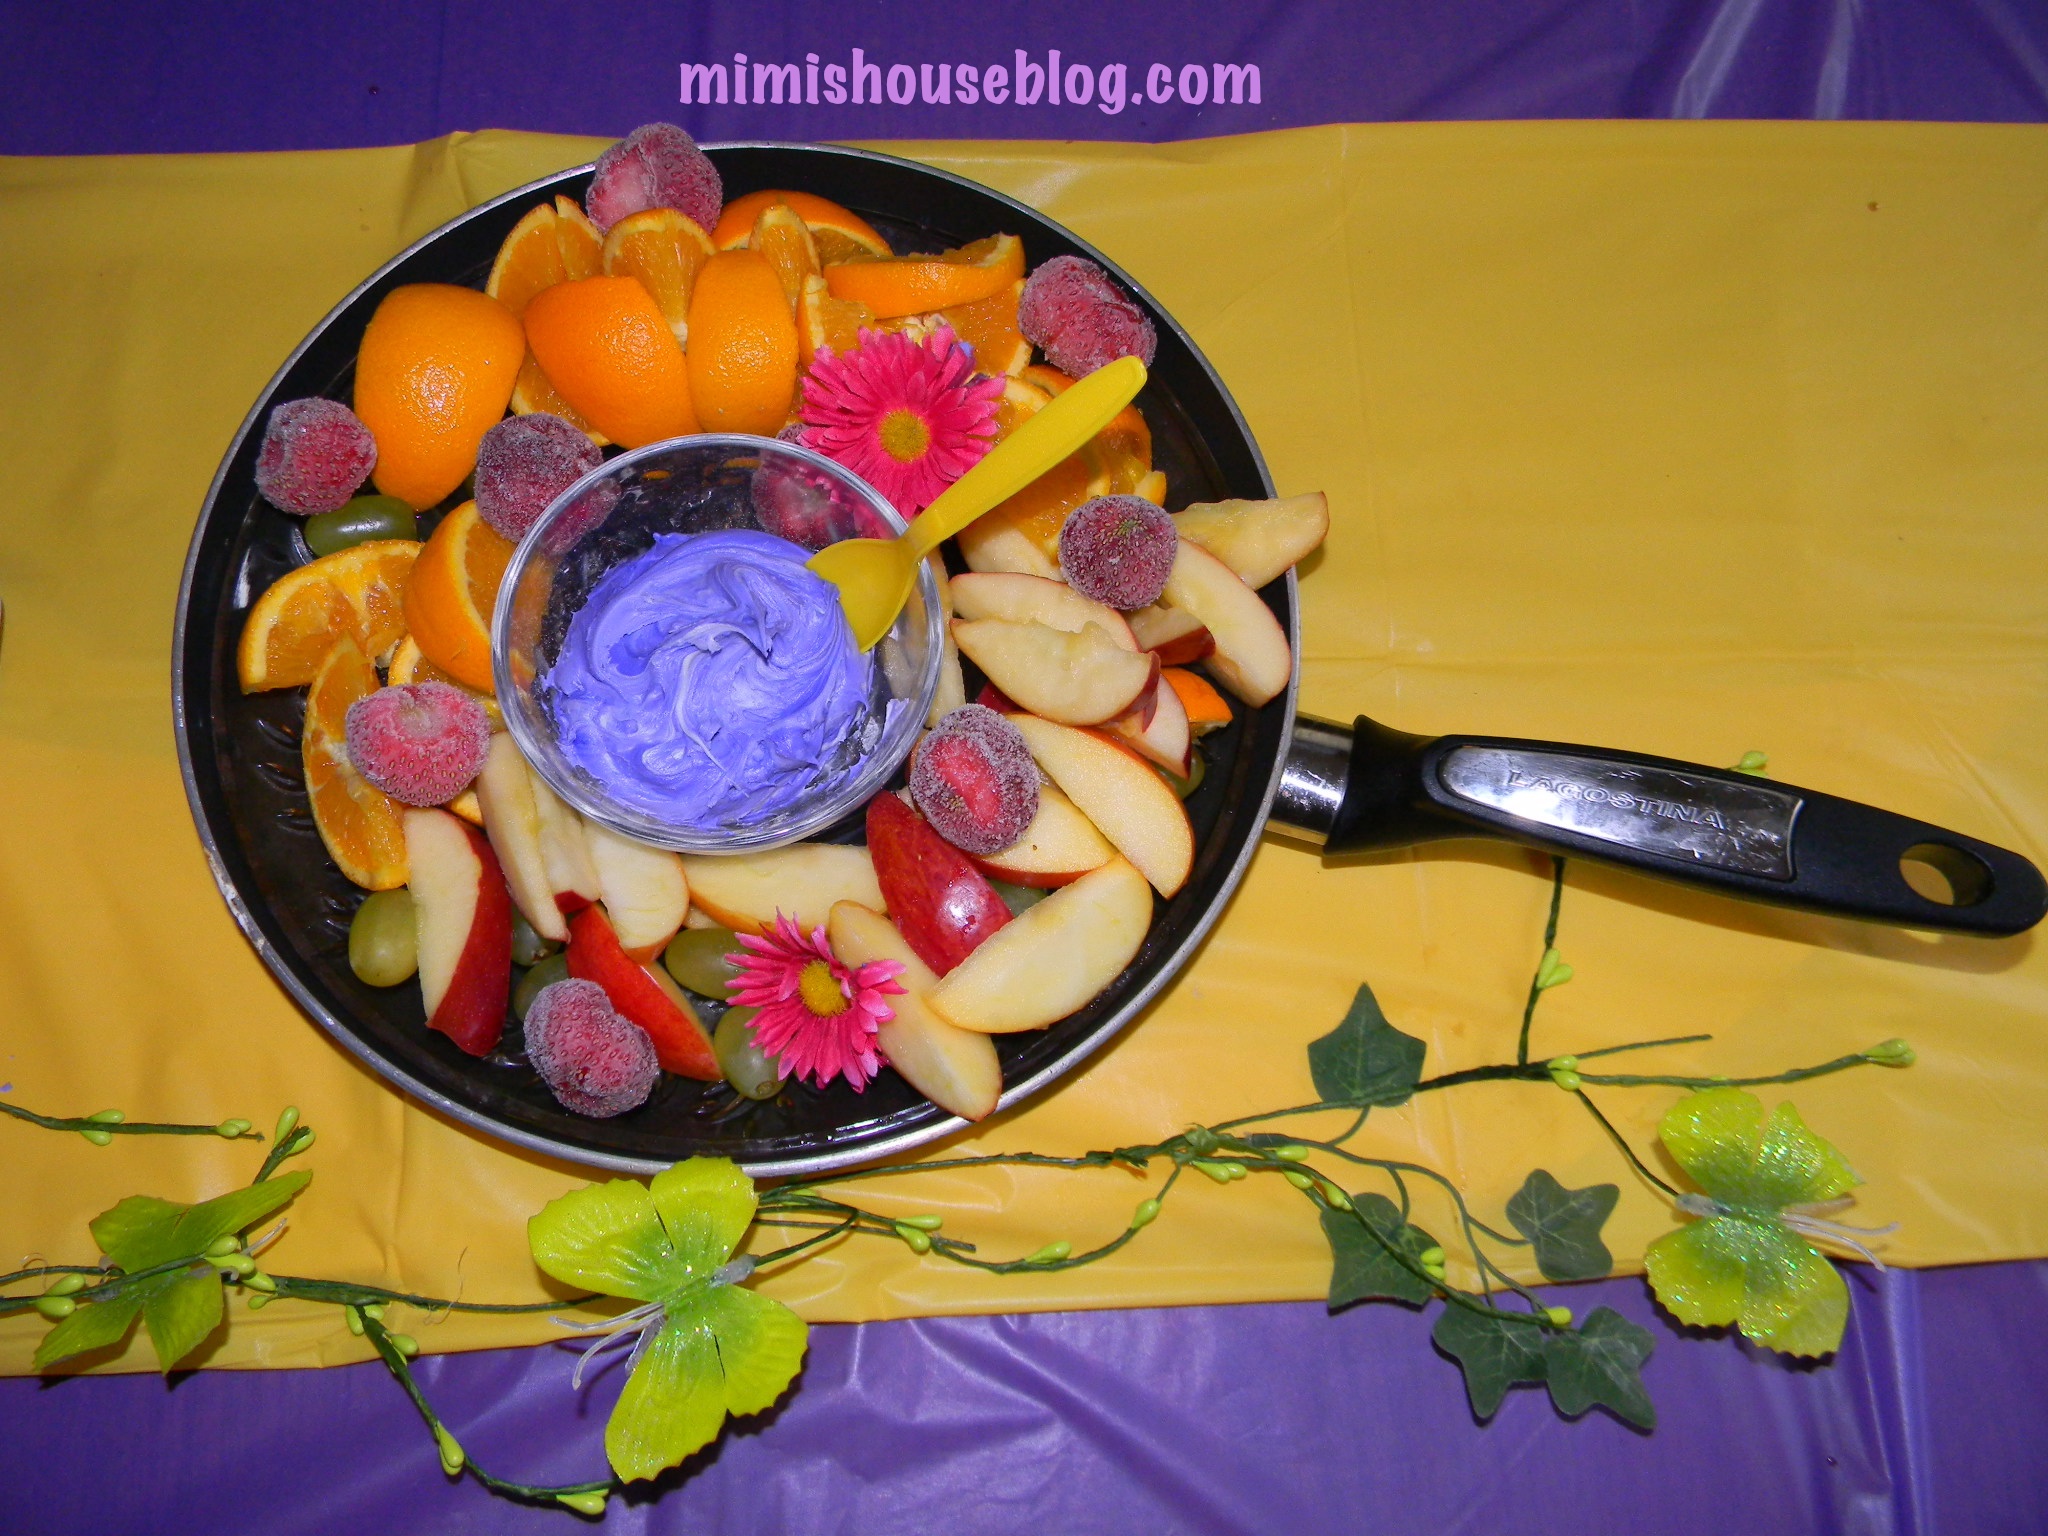
In Keeping with the theme of the Tangled movie, we made a fruit platter using a frying opan as the serving tray. For an added touch, we tinted the fruit dip with purple food coloring.
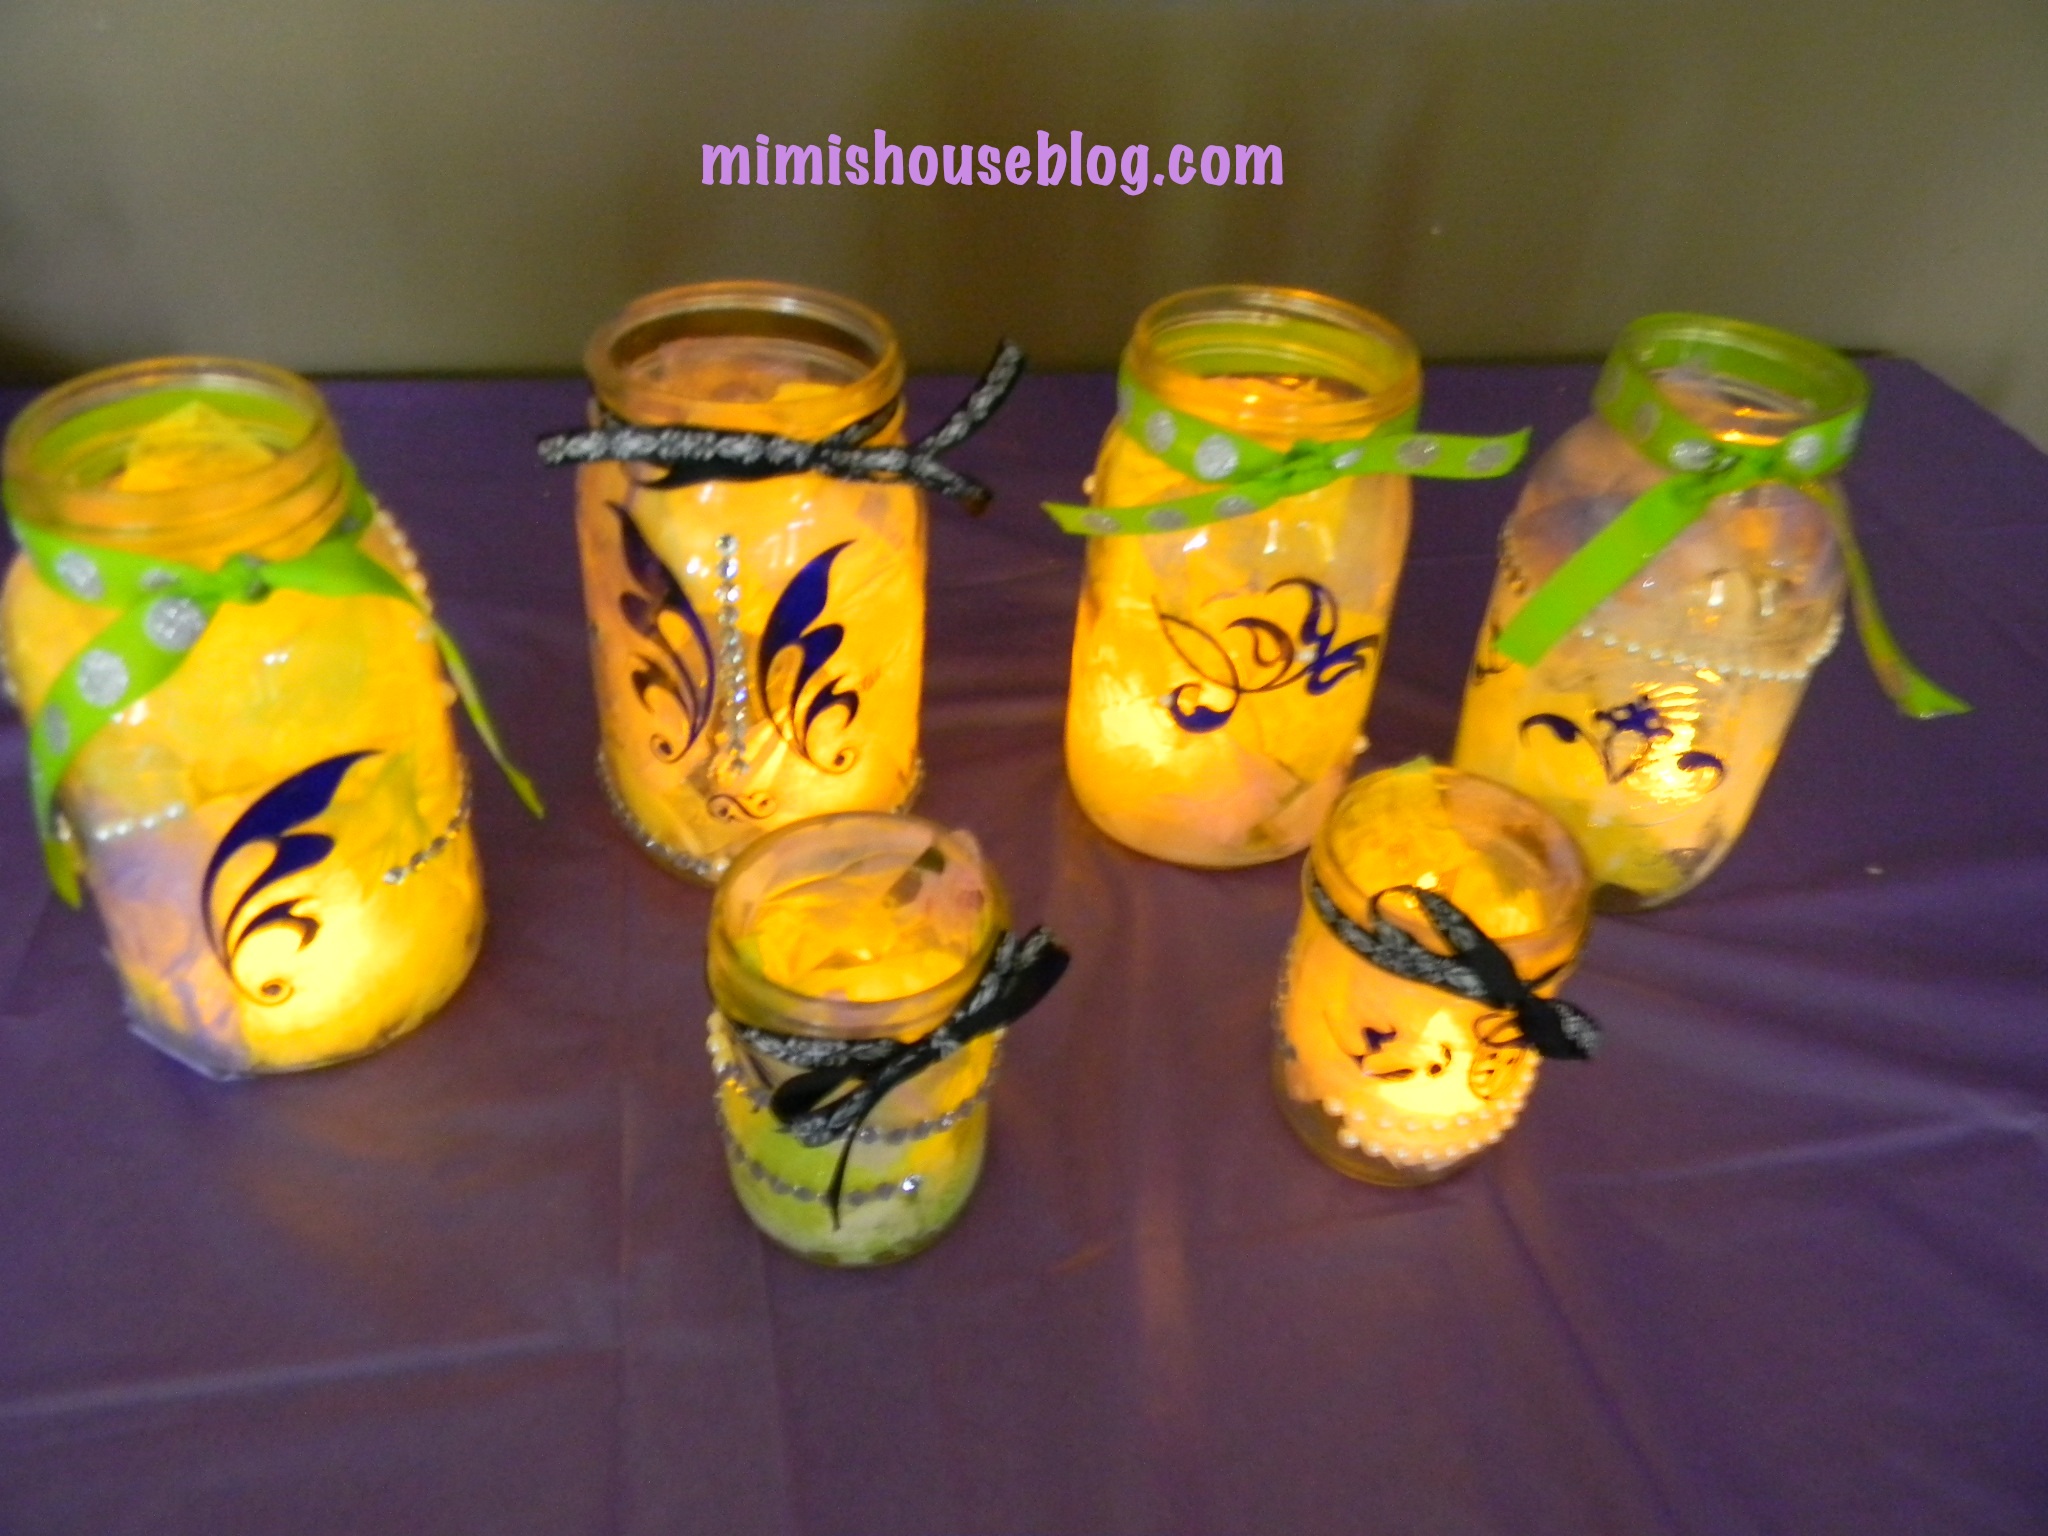
Rapunzel’s Lanterns
For a party activity the girls, made these lanterns using canning jars and torn pieces of tissue paper. Glue the tissue paper inside the lanterns. Decorate the outside with stickers, beads, ribbon, etc. Add a fake tea light (found at most dollar stores) for the light. Do not use real candles as the tissue paper can catch on fire! When all lit up these lanterns look amazing!
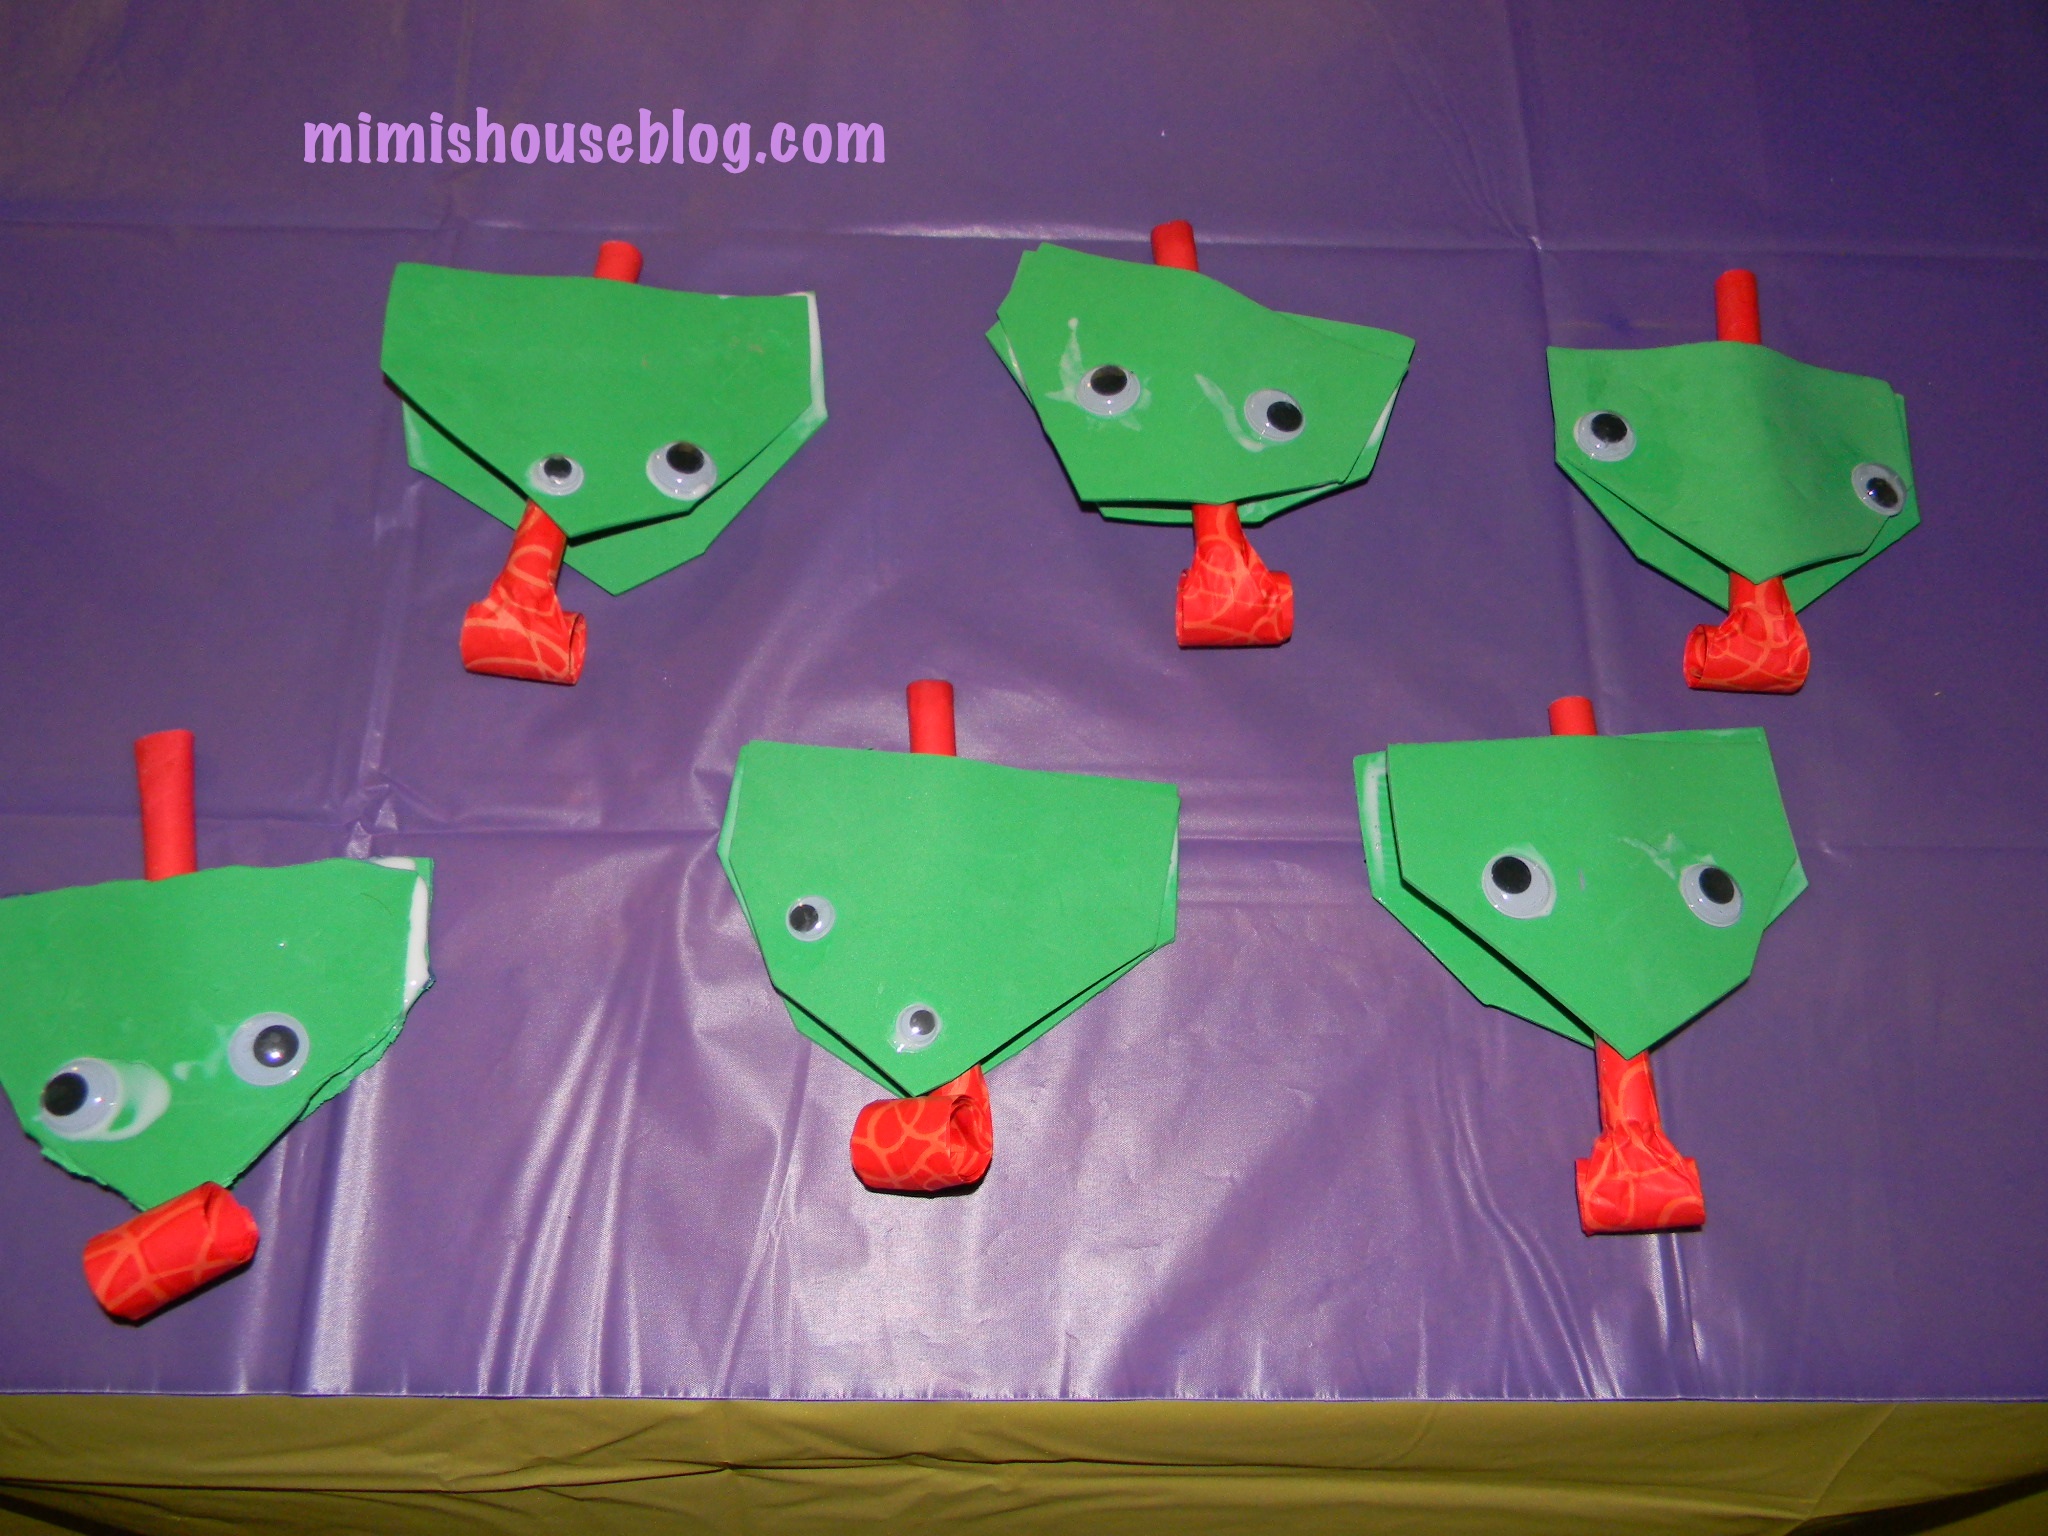
Pascal Blowers! These were fun for the kids to make. We cut out 2 face shapes from craft foam. Glued them together with a red party blower inside. Then glued google eyes to the front. Tip: To help keep the foam from coming apart while the glue was drying, we attach a clothespin to each side of the face.
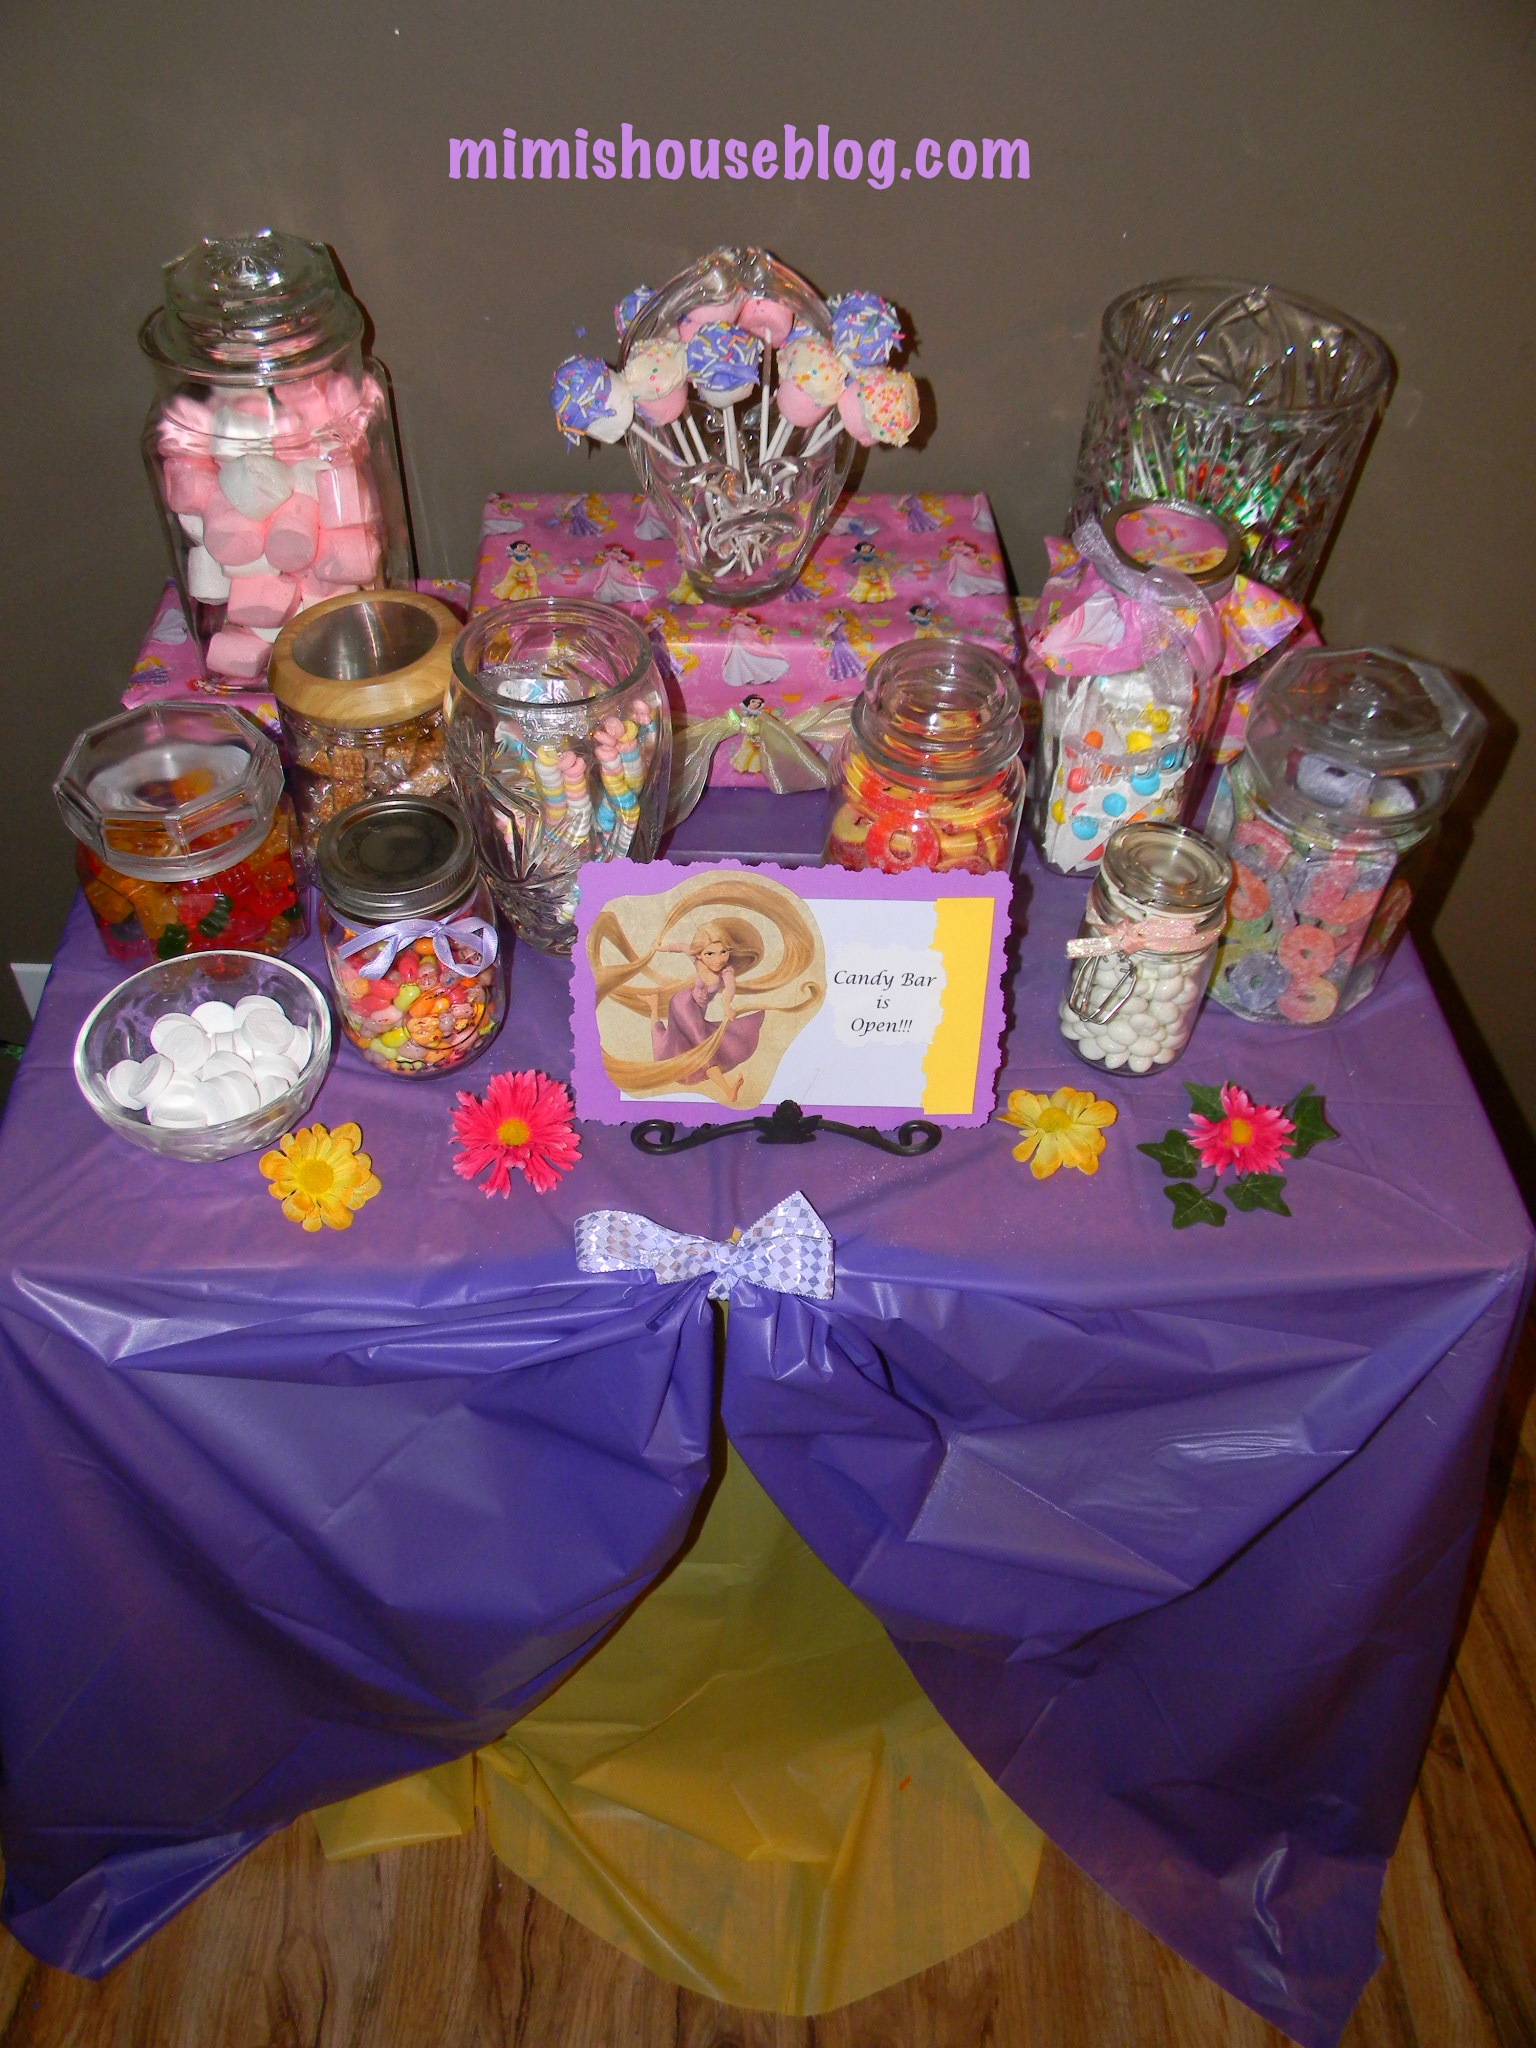
We chose various colorful candies to put on the candy table. In order to keep the girls from getting tummy aches, we added a closed and open sign so they knew when they could get candy and when it was time for a break. Most of the candies we purchased from the bulk isle in our grocery store (much cheaper that way!) and dressed them up in various containers I found (and washed!) at thrift stores.
.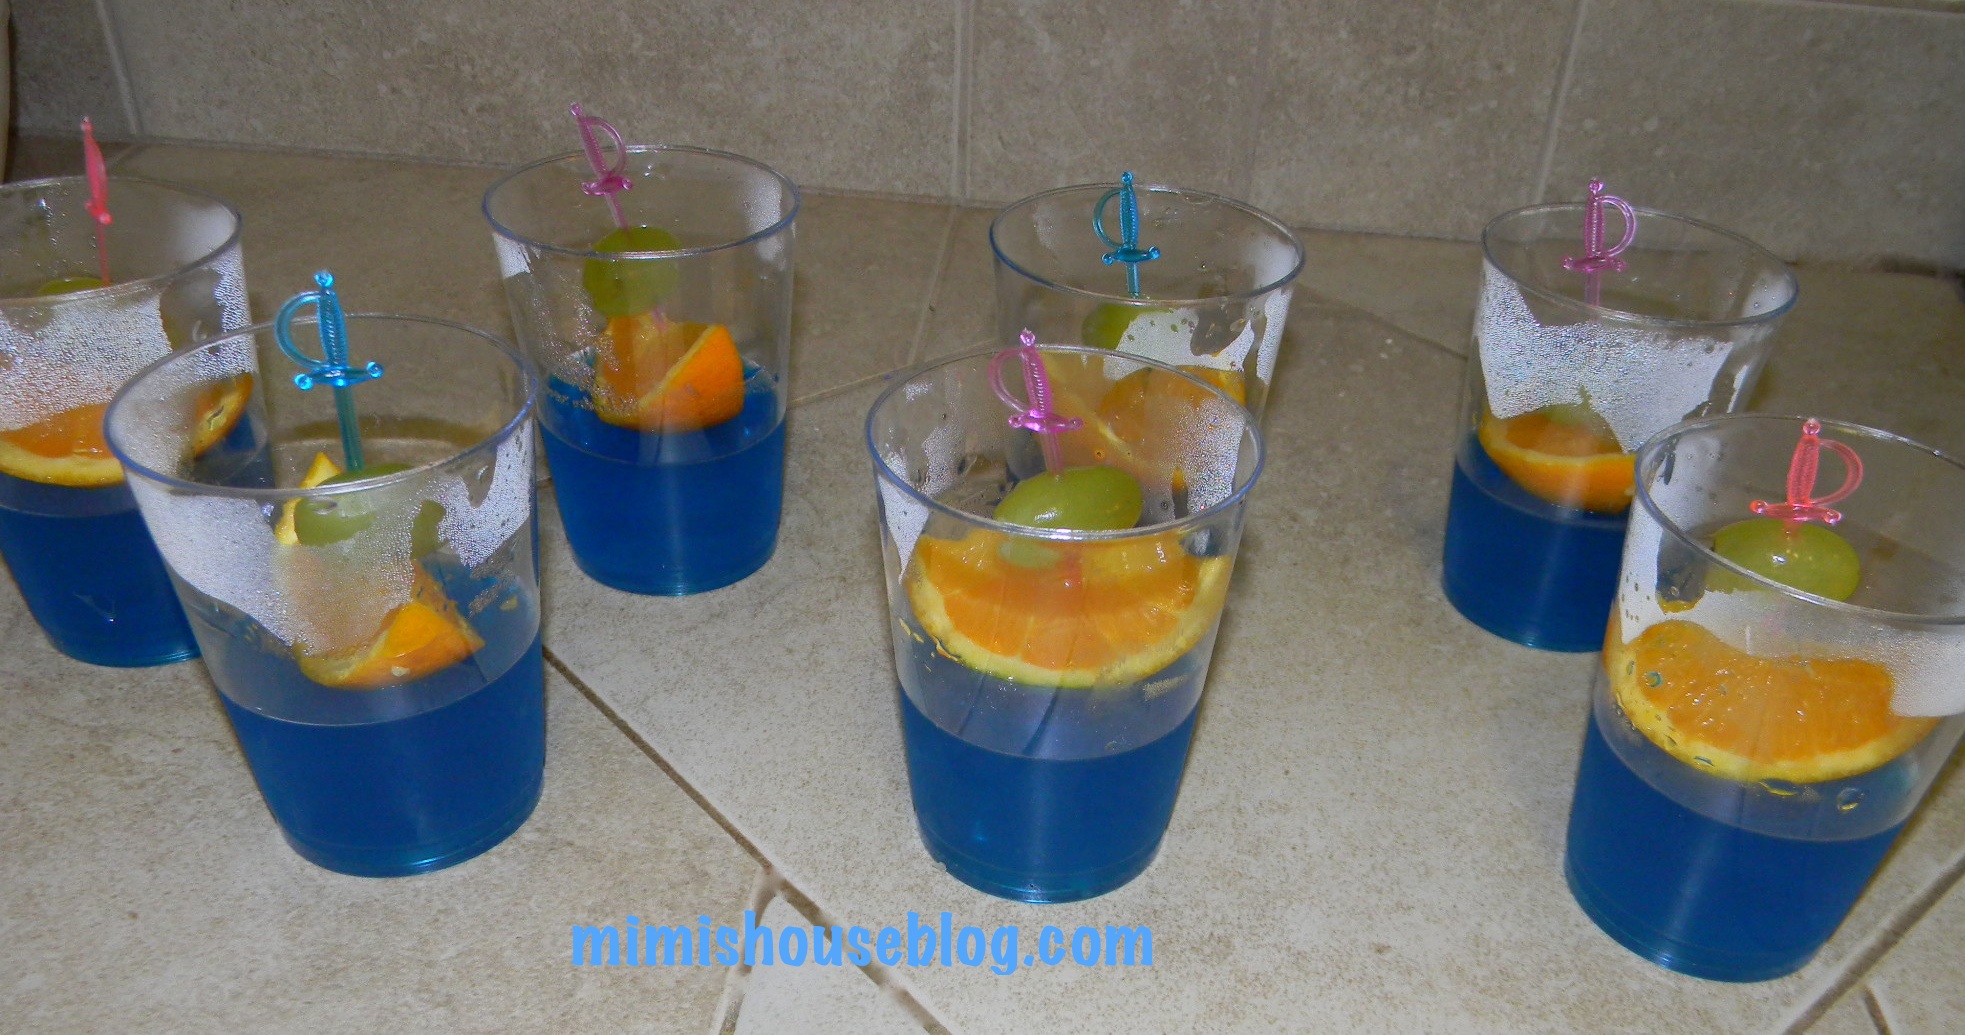
Jello Boats
Made to represent the boat that Flynn and Rapunzel rode in the movie. Using blue jello, we filled clear plastic cups half full for the water. We then garnished the cups with boats made from orange slices and grapes put together with a toothpick.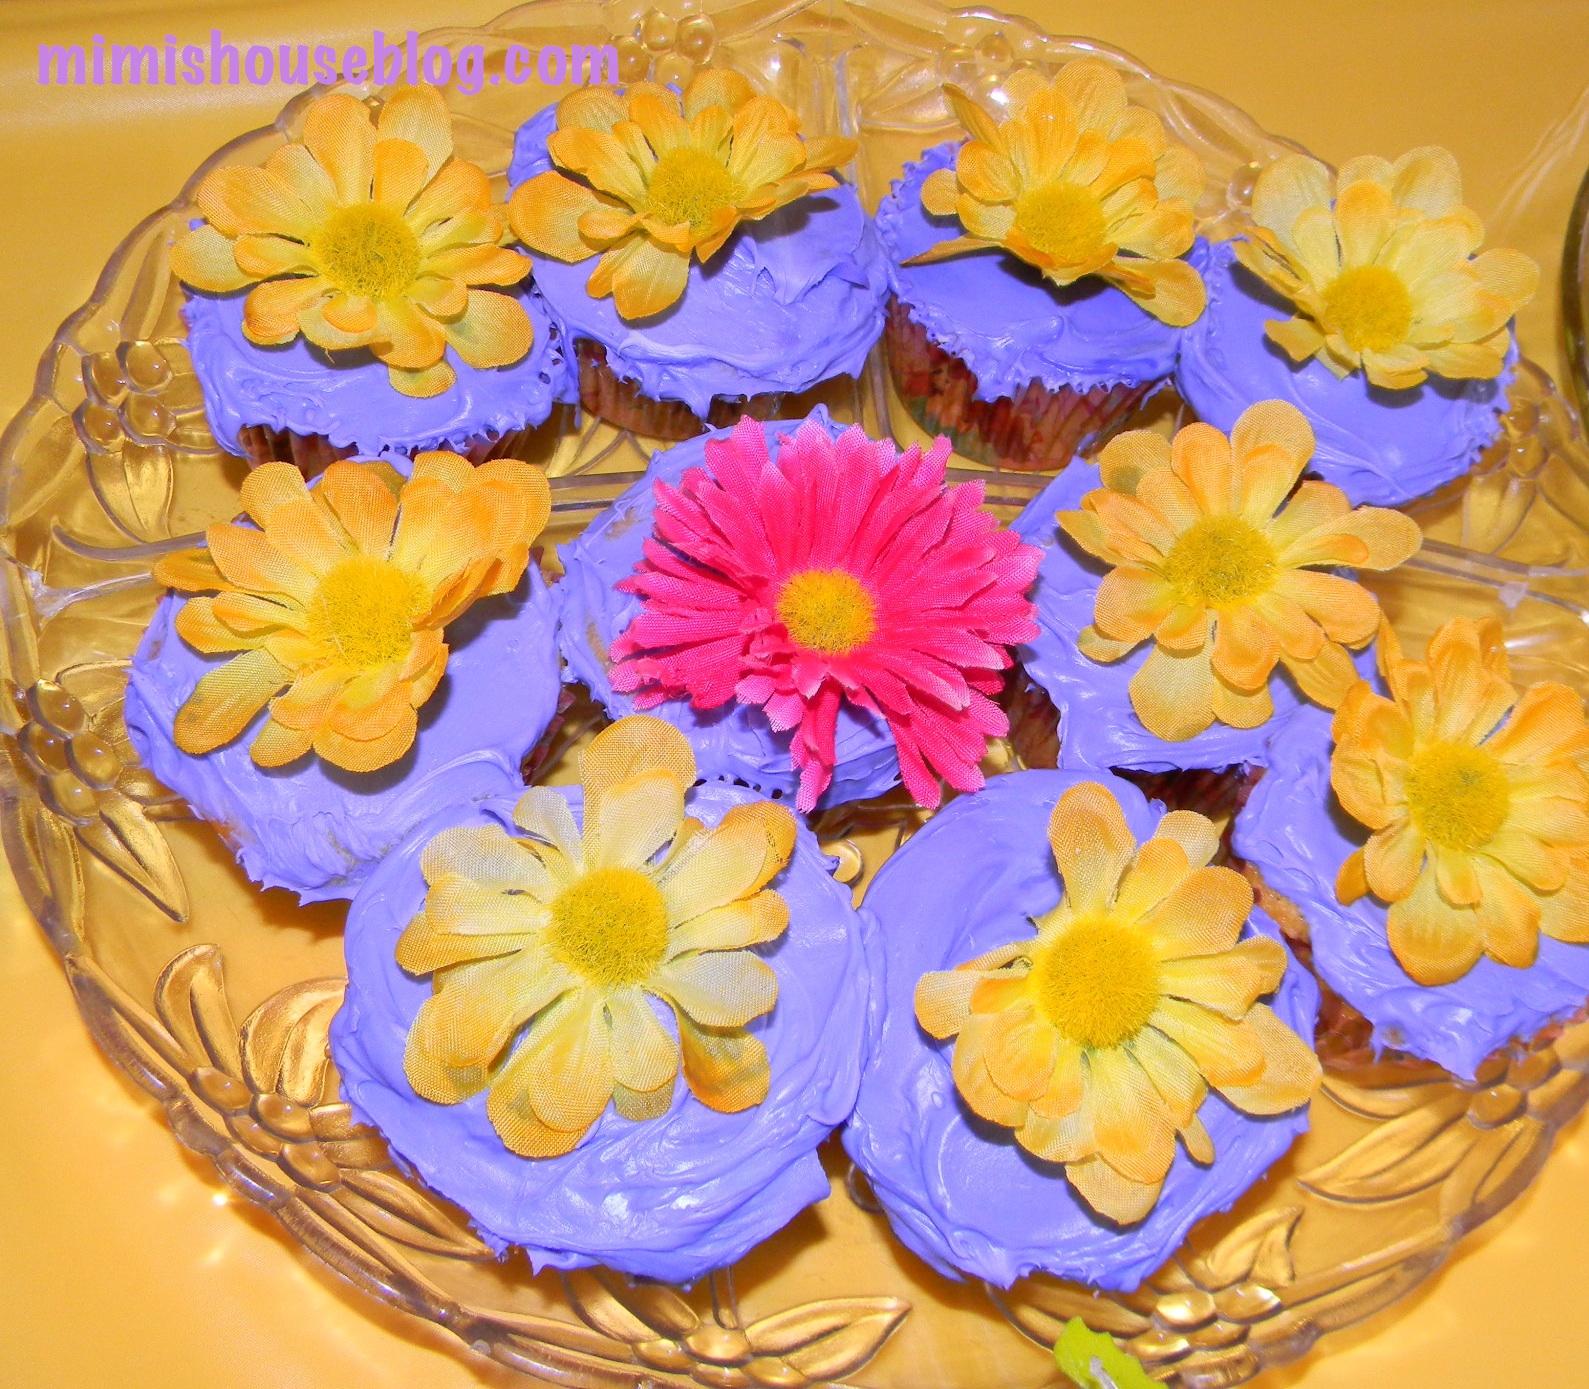
Instead of spending lots of extra time and money on a cake this year, we opted to spend our resources on the other party stuff. So instead we came up with a simple but clever idea for cupcakes. Purple icing with silk flowers on top. The girls LOVED them! After licking the icing off of the cupcakes, they put the flowers in their hair.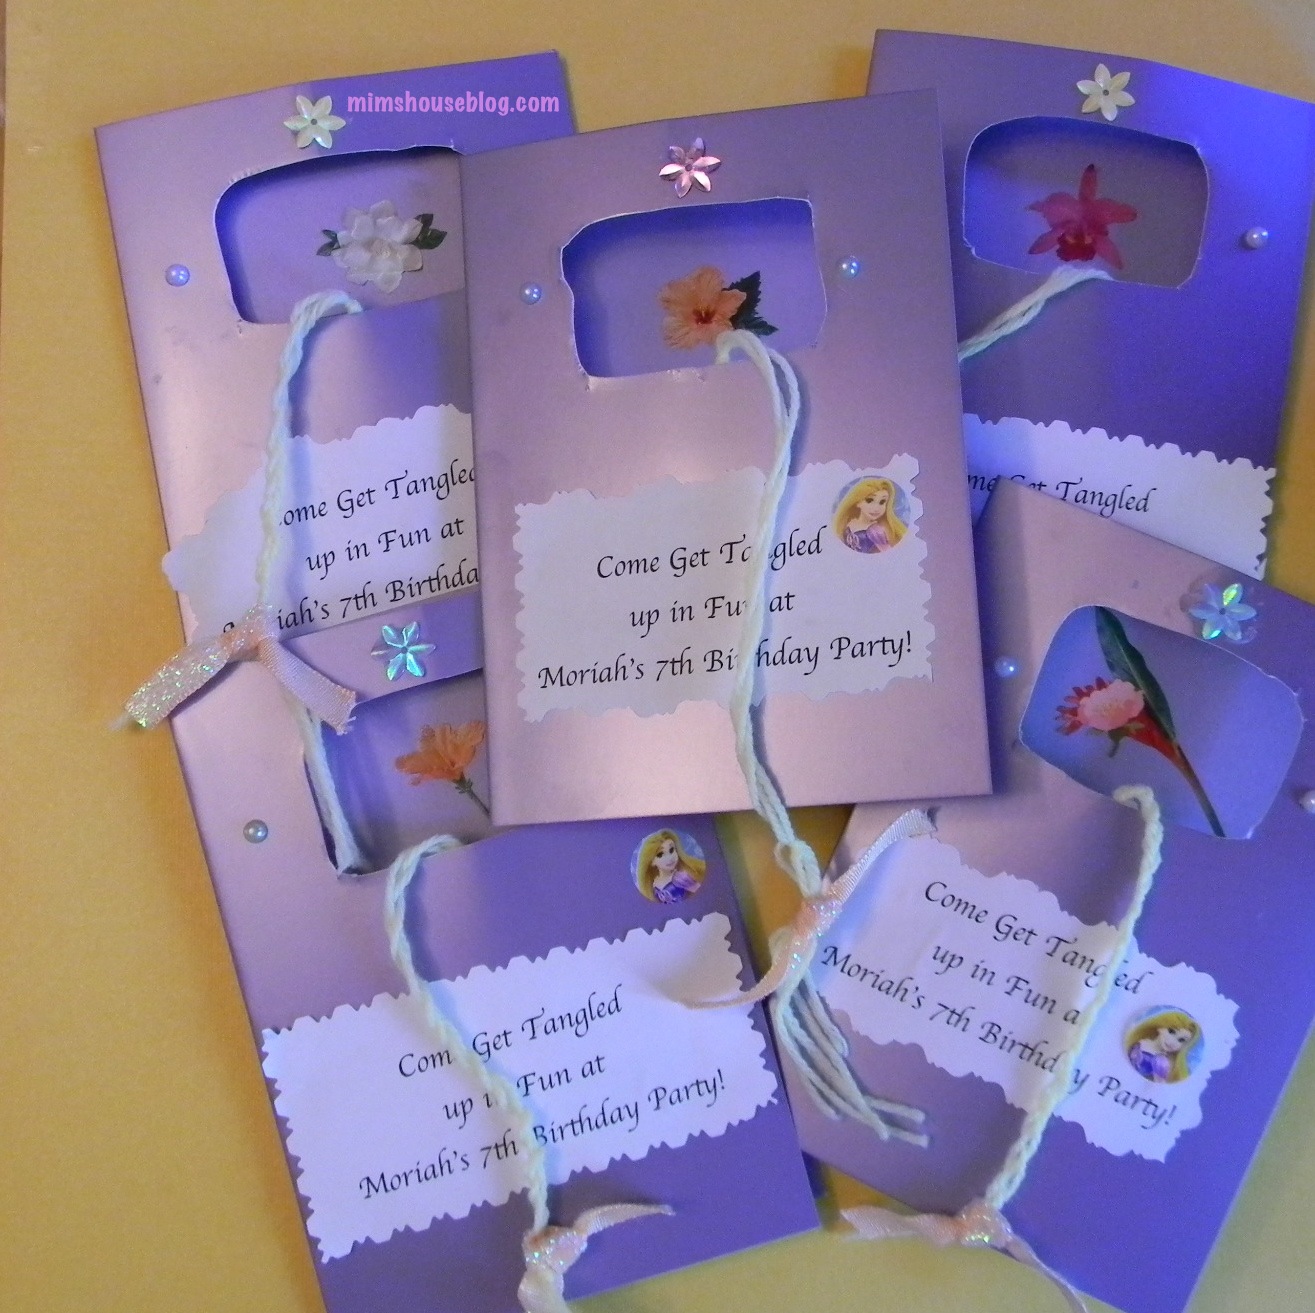
Party Invites were made from pre-packaged card sets (I found these at the Dollar Store for $1.50 per package of 8). We cut a window in the top and braided some yarn to hang out of the window for Rapunzel’s hair.
All in all it turned out to be a really fun party. But I think Rapunzel summed it up best when she says..”BEST DAY EVER!” Hope these ideas inspire you to create a fun Tangled party for your little princess!
Welcome in the New School Year by Celebrating Diversity! 
Here is a great lesson plan for young children to promote diversity and foster empathy. What a fabulous way to start the fall season!
Objectives: • Understand there are differences and similarities among people • Appreciate diversity and uniqueness among individuals and cultures • Recognize traits, needs, and emotions all people have in common.
Read: We Are All Alike, We Are All Different
“We Are All Alike… We Are All Different,” a book written by children for children, reinforces multicultural and anti-bias learning and appreciation. With original drawings and their own lyrical words, the children in Rosalind Goldberg’s kindergarten class at Cheltenham Elementary School in Pennsylvania share the ways they look and feel, the games they play, the foods they like, the homes they live in, and the families they live with, concluding that “We are all alike. We are all different. We are a family.” This class-made book is the result of a Scholastic awards program sponsored by Cabbage Patch Kids.
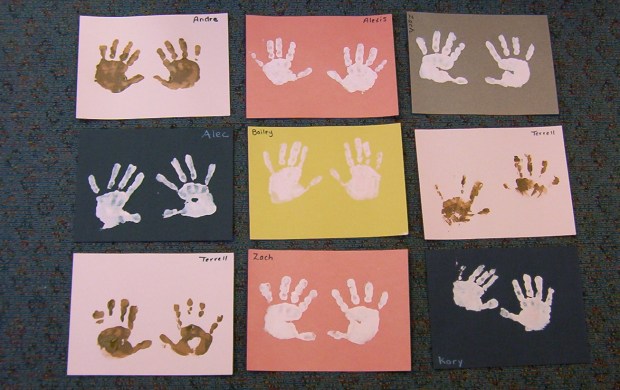
Art: Have each child make handprints using multicultural paint!
Music: Sing along to the song “We Are All ALike ”
Words and Music: Hap Palmer*
Activity: During the chorus, repeat each phrase like an echo. During the verses, point to your eyes, your skin, your whole body, and your heart as each is named.
Lyrics:
Chorus 1: Like each flake of snow floating through the sky We are all unique, we are all alike Take a look around, you will see it’s true You’re a lot like me, I’m a lot like you
Verse 1: Everyone has eyes, they come in different shapes Some are brown, some are blue, some are gray or green Everyone has skin, it comes in many shades It may be dark, it may be light, or somewhere in between
Chorus 2: Everybody lives, everybody breathes Everybody needs, everybody dreams Everyone is born and changes through the years We can laugh and cry and share our hopes and fears
Verse 2: We all have a body, any size will do It may be thick, it may be thin, it could be short or tall We all have a heart, let it beat with pride A common bond goes on and on, we’re people one and all!
Follow Up:
Think of ways you are like your classmates or family members. Think of ways you are different. Make a list of other living things. Note the ways they are alike and different.
*From happalmer.com
“For a small child there is no division between playing and learning; between the things he or she does ‘just for fun’ and things that are ‘educational.’ The child learns while living and any part of living that is enjoyable is also play. ~ Penelope Leach (psychologist and author)
Children experience the world around them in awe and wonder. They learn by observing and imitating which is why play is so crucial in early childhood. Role playing teaches valuable skills that will help young children as they enter into the school years. Problem solving and reading readiness are just two of the many skills that can be cultivated through pretend play.
I have listed a few simple and frugal ideas for initiating free play with young children. The more freedom a child is given to explore and create on his or her own the more your child will foster independence and confidence within himself.
Dress Up- Give children some of your old clothes in a laundry basket. They can not only dress up but they can pretend to do laundry.
Boxes- Children love cardboard boxes! Large ones can make houses and cars while smaller boxes can become building blocks. Give children crayons and stickers to decorate them with.
Grocery Store- Empty food containers and bags make excellent grocery store material. Children love pretending to shop.
Play-dough- Give children cookie cutters and kitchen utensils to create play-dough masterpieces with. Children can spend hours working with play-dough. Here is my favourite play-dough recipe
Play Dough Recipe:
1 cup white flour
1/2 cup salt
2 tablespoon cream of tartar (find it in the spice section)
1 tablespoon oil
1 cup water
food coloring
Mix first 4 ingredients in a pan. Add water and mix well. Cook over medium heat, stirring constantly, for 3 – 5 minutes. Dough will become difficult to stir and form a “clump”. Remove from stove and knead for 5 minutes–add food colouring during kneading process. Play dough will keep for a long time stored in a covered plastic container or plastic sandwich bag.
As one can see, opportunities for children to play don’t have to be expensive or complicated. They simply need the encouragement and the time to nurture free play. There are endless way to foster this development in young children. I hope that these few suggestions will spark some ideas for you to create a playful atmosphere in your home or classroom.


